
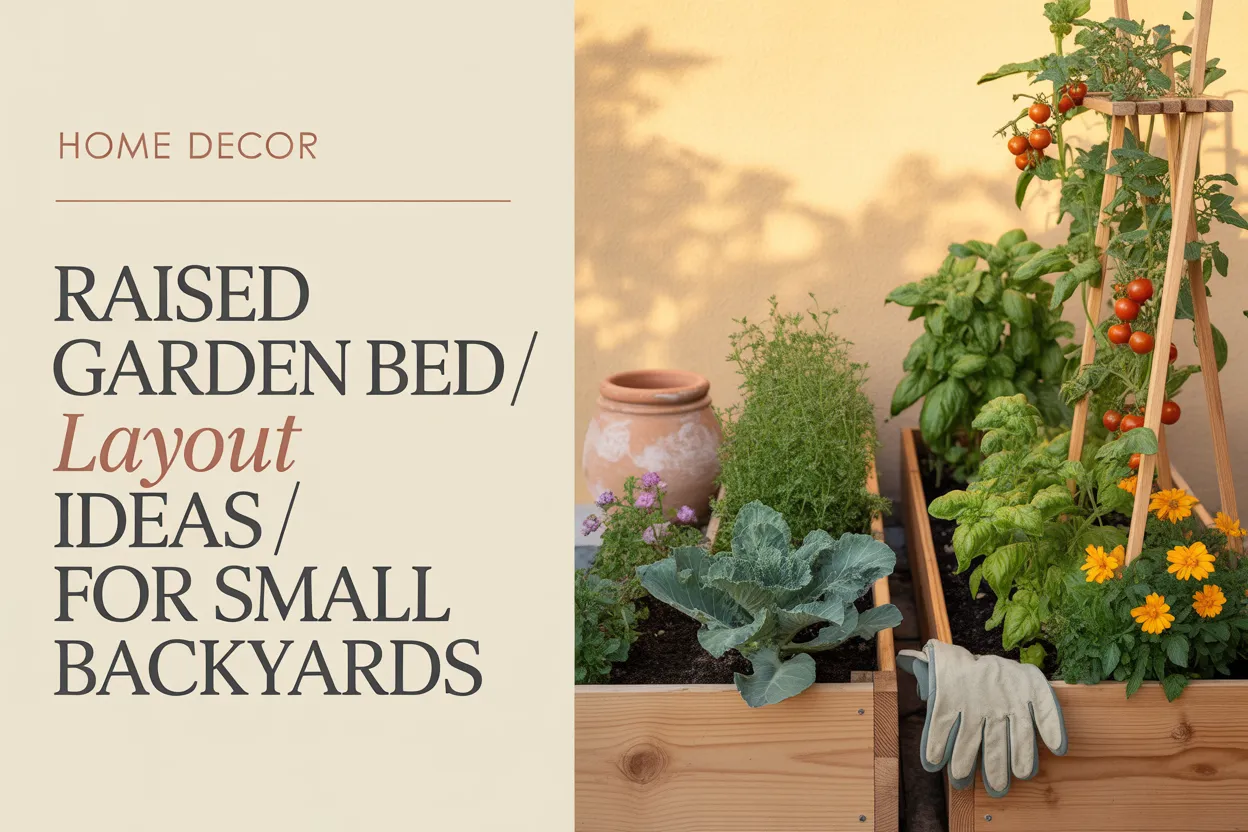
You step into the backyard and there it is again. That awkward 12 by 14 foot patch of patchy grass, a sagging fence, and zero sense of what to grow where. Maybe you bought a galvanized raised bed last spring and it’s still sitting empty against the shed. Maybe you have one wooden box producing three sad cherry tomatoes and a forest of basil you never wanted. I’ve been there twice, in two different rentals, and the fix every time was layout, not more dirt.
These raised garden bed layout ideas are built specifically for small backyards under 500 square feet of usable garden space. We’ll go zone by zone, price tier by price tier, and I’ll show you the exact grid I used last summer to triple my pepper yield in a 4 by 8 cedar bed.
Who This Guide Is For
This is for you if you fall into one of these buckets:
- Renters who can’t dig into the lawn and need movable or no-drill options
- Homeowners with small backyards (under 500 square feet of growing area)
- First-time gardeners who froze the second someone said “companion planting”
- Anyone who already owns a raised bed and is staring at it wondering what now
If you’re planning a half-acre homestead, this isn’t your post. We’re staying tight, smart, and small.
How This Raised Garden Bed Layout Ideas Post Is Organized
I’m grouping these ideas by layout type and bed shape, then layering in price tier and skill level inside each section. So you can scan straight to the layout that fits your yard, your budget, and your gardening confidence.
Quick map of what’s coming:
- Foundation rules (sun, spacing, the 70/30 rule)
- Single-bed layouts (4×4 and 4×8)
- Multi-bed layouts for small yards
- Vertical and trellis-driven layouts
- Style and aesthetic layouts (Modern Farmhouse, Japandi-inspired, cottage potager)
- Budget vs splurge breakdown
- Common mistakes
- FAQ
Before You Sketch a Single Bed: Sun-Map Your Yard
This is the step every top-ranking article skipped, and it’s the reason most layouts fail.
What it is: A 1-day audit of where the sun actually lands in your backyard, hour by hour.
Why it works: Vegetables need 6 to 8 hours of direct sun. If you place your bed where it only gets 4, no layout in the world will save your tomatoes.
How to execute it:
- Pick a clear day. Set a phone timer for 8 a.m., 10 a.m., 12 p.m., 2 p.m., 4 p.m., and 6 p.m.
- At each timer, snap a photo from the same spot facing your yard.
- Mark sun and shade zones on a quick paper sketch.
- Place your bed (or beds) in the spot that hits 6+ hours. Lean toward morning sun for tomatoes, peppers, and squash.
The first time I did this in my old rental, I realized the “sunny corner” I’d been planning around was in shade by 1 p.m. because of the neighbor’s maple. The bed moved 8 feet. The harvest doubled.

Foundation Rule: The 70/30 Layout Split
The 70/30 rule is one of the People Also Ask favorites, and almost no one explains how to actually use it as a layout tool.
What it is: Dedicate 70 percent of your raised bed to plants you’ll definitely eat, and 30 percent to experiments, flowers, and pollinator support.
Why it works: It keeps small-backyard gardens productive without making them feel like a farm. The 30 percent (marigolds, nasturtium, calendula, zinnias) attracts pollinators and pulls pests away from your edibles.
How to execute it on a 4×8 bed:
- 70 percent (about 22 square feet): tomatoes, peppers, lettuce, kale, herbs you cook with weekly.
- 30 percent (about 10 square feet): a flower border on the south end, plus one nasturtium tucked in each corner.
Single-Bed Layouts for the 4×4 Raised Bed
The 4 by 4 is the small-backyard workhorse. You can reach the center from any side, and it fits in side yards as narrow as 6 feet.
Layout 1: The Salad Bar Grid (Beginner, Budget)
What it is: A 16-square grid using the square foot gardening method, planted entirely with cut-and-come-again greens.
Why it works: You harvest from one square at a time, and the bed regrows in 10 to 14 days. Perfect for renters who want fast wins.
How to execute:
- Divide the bed into 16 squares (1 foot each) with twine and small nails.
- Plant 4 squares of butter lettuce, 4 of arugula, 4 of spinach, 2 of chard, 2 of cilantro.
- Harvest outer leaves only. Never pull the whole plant.
Total cost in seeds: under $15. Use a $40 galvanized 4×4 from Tractor Supply or Lowe’s, or a Vego Garden raised bed if you want to splurge.
Layout 2: The Salsa Square (Beginner-Intermediate, Mid-Range)
What it is: Everything you need to make fresh salsa in one 4×4 bed.
Why it works: Tomato, pepper, onion, and cilantro are companion-friendly and have similar water needs.
How to execute:
- Center: 1 indeterminate cherry tomato with a 6-foot stake.
- North side: 2 jalapeño plants.
- East side: 4 to 6 green onion sets.
- West side: 1 row of cilantro (succession plant every 3 weeks).
- South side: 2 marigolds for pest control.
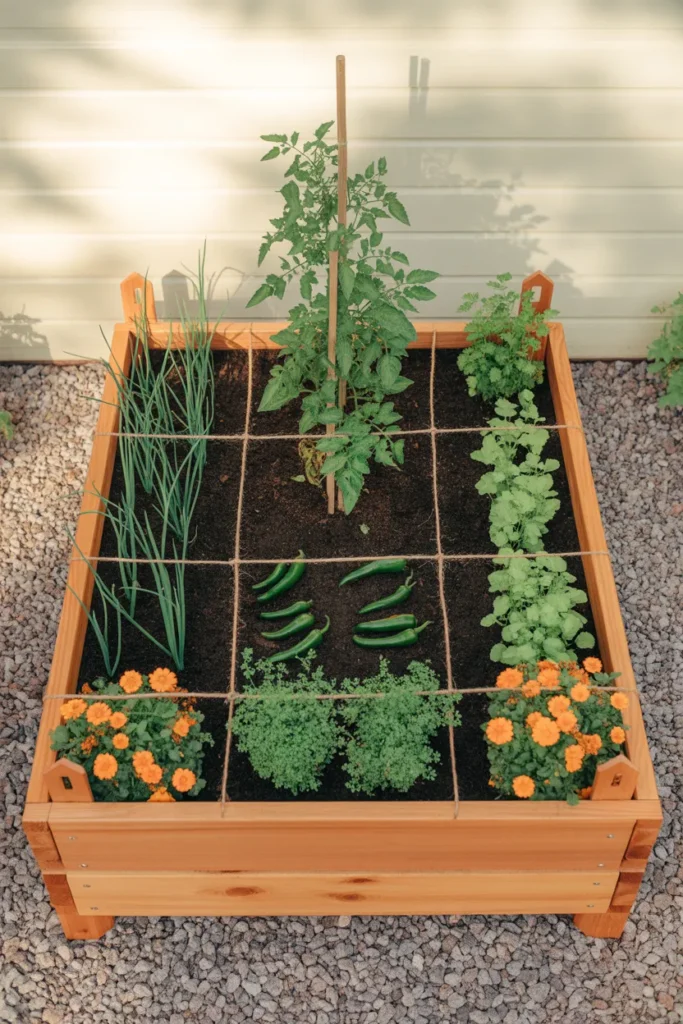
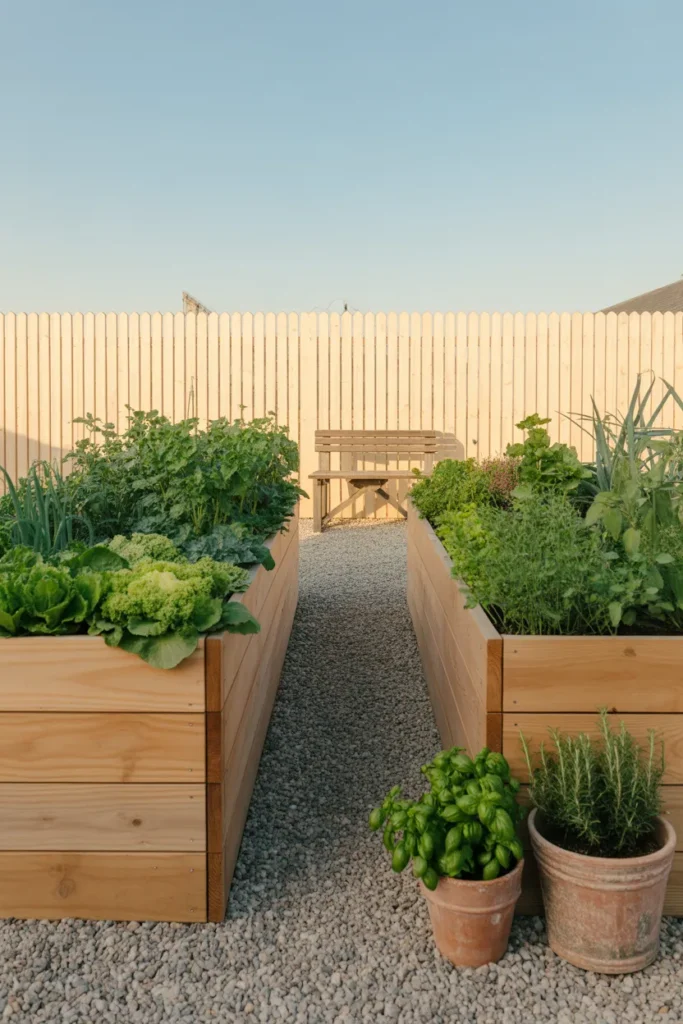
Single-Bed Layouts for the 4×8 Raised Bed
The 4×8 is the most-Pinned size for a reason. It gives you 32 square feet of growing space while still letting you reach the center from either long side.
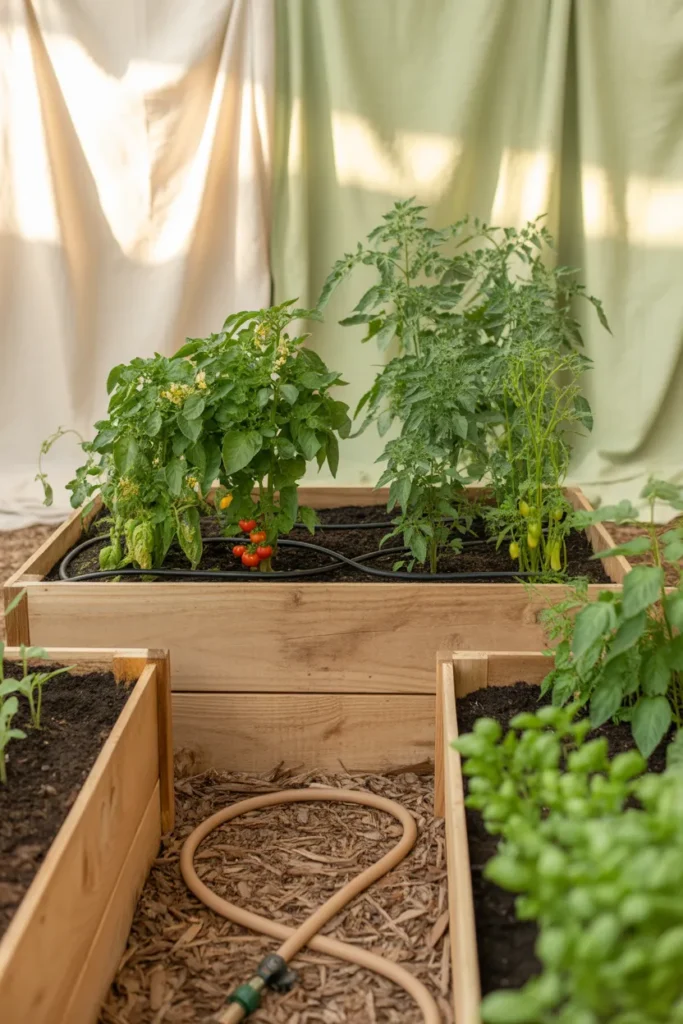
Layout 3: The Family Feeder
What it is: A layout designed to feed two adults and two kids fresh produce from June through October.
Why it works: It splits the bed into a tomato zone, a leafy zone, and a root zone, so plants with similar needs cluster together.
How to execute (looking at the bed with the long side facing you):
- Left third: 2 indeterminate tomatoes on a string trellis, underplanted with basil.
- Middle third: 4 pepper plants, 2 squares of bush beans, 2 squares of carrots.
- Right third: 4 squares of lettuce, 2 squares of kale, 1 row of green onions, 1 row of radishes for succession planting.
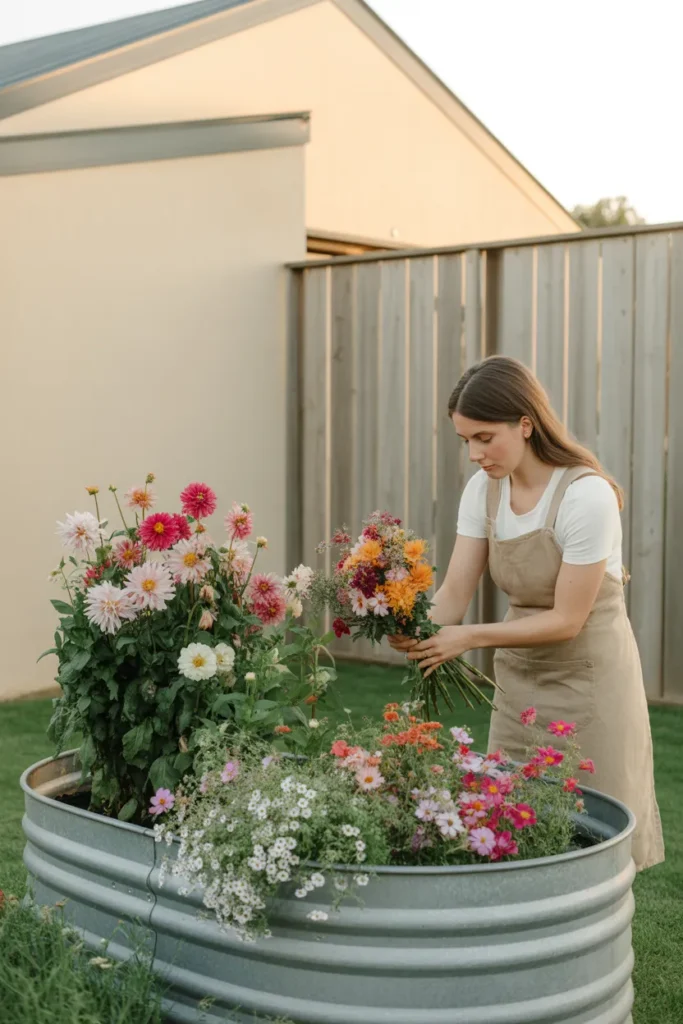
Layout 4: The Cut Flower 4×8 (Modern Farmhouse style)
What it is: A 4×8 bed dedicated to cut flowers you can bring inside all summer.
Why it works: You get a lush, layered look from a small footprint, plus the pollinator magnetism boosts any nearby vegetable bed.
How to execute:
- Back row (north): 1 row of dahlias or zinnias for height.
- Middle row: snapdragons and cosmos.
- Front row (south): a border of sweet alyssum and calendula.
This is the layout my friend ran in her Atlanta rental on a Vego 17-inch tall galvanized bed. She cut a fresh bouquet every Sunday from May to October.
Multi-Bed Layouts for Small Yards
If you have room for two or three beds, the layout shape matters more than the bed itself.
Layout 5: The U-Shape Kitchen Garden
What it is: Three beds arranged in a U with a gravel or pea-stone path in the center.
Why it works: You stand in the middle and reach everything. It feels like a tiny European potager and it photographs beautifully.
How to execute:
- 3 beds, each 2 feet by 6 feet (works in yards as narrow as 10 feet).
- Leave 30 to 36 inches of path width inside the U so you can kneel comfortably.
- Plant the back wall of the U with the tallest crops (pole beans, tomatoes, sunflowers).
Layout 6: The Parallel Twins
What it is: Two 4×8 beds running parallel with a 4-foot path between them.
Why it works: It’s the easiest multi-bed layout to build, and the wide center path means you can fit a wheelbarrow, a folding garden bench, or kids underfoot.
How to execute:
- Run beds north to south so the sun hits both equally.
- Use one bed for “summer crops” (tomatoes, peppers, basil) and the other for “cool crops” (lettuce, kale, broccoli, peas).
- Rotate them next year. This breaks pest cycles without you doing anything fancy.
For step-by-step build instructions, our DIY raised garden bed plans walk you through three skill levels in one weekend.
Layout 7: The L-Shape Corner Garden
What it is: Two beds meeting at a 90-degree angle in a corner of the yard.
Why it works: It uses a dead corner that usually grows weeds. It also creates a sheltered microclimate that protects tender plants from wind.
How to execute:
- Bed 1: 2 feet by 6 feet against the longer fence (warmer wall, sun-loving crops).
- Bed 2: 2 feet by 4 feet against the shorter fence (cooler wall, leafy greens).
- Trellis the inside corner for cucumbers or pole beans.
Vertical and Trellis-Driven Layouts
Going up is the small-backyard cheat code. You can double your effective growing space without adding a single square foot of footprint.
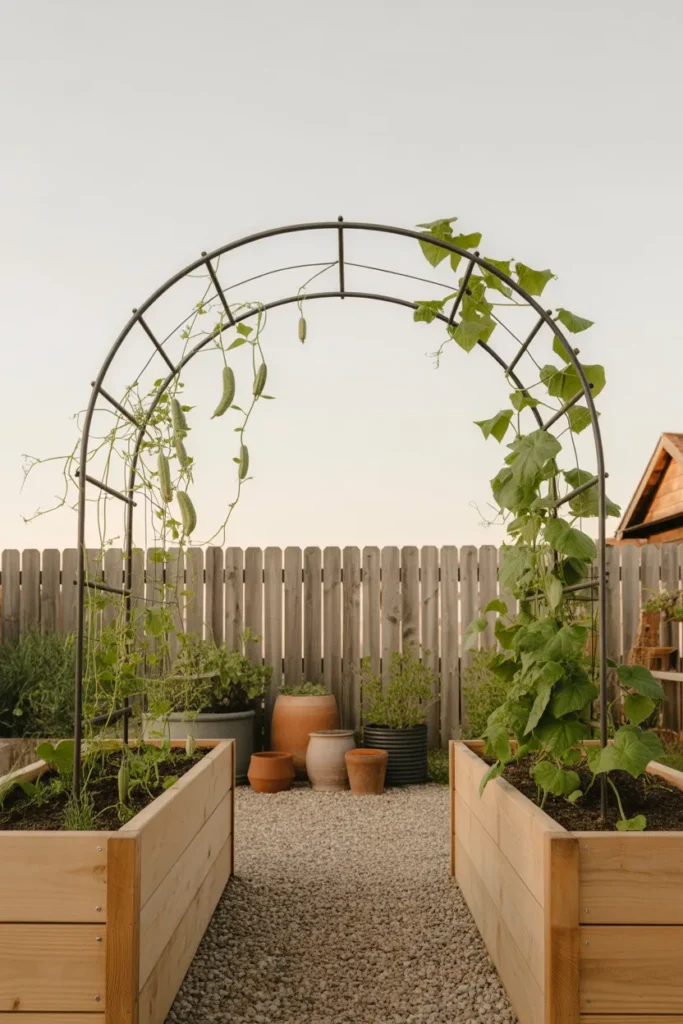
Layout 8: The Arch-Connected Twin Beds
What it is: Two raised beds spaced 4 feet apart, connected over the path by a metal cattle panel arch.
Why it works: You grow climbers (cucumbers, pole beans, small melons, mini pumpkins) on the arch and walk under your harvest. It’s the single most-Pinned layout for a reason.
How to execute:
- Set beds 4 feet apart.
- Bend a 16-foot cattle panel into an arch and zip-tie it to the inside walls of both beds.
- Plant 2 cucumber starts at the base of each side. They’ll meet at the top by mid-July.
Layout 9: The Back-Wall Trellis Layout
What it is: A single 4×8 bed pushed against a fence with a 6-foot trellis running the length of the back wall.
Why it works: Renters love this one. No drilling into the fence, no permanent structures.
How to execute:
- Pound 6-foot T-posts into the bed itself, every 4 feet along the back edge.
- String jute or use a roll of 4-foot welded wire between them.
- Plant pole beans, peas, or indeterminate tomatoes along the back. Plant shorter crops in front.
Style-Driven Layout Ideas
The layout doesn’t just feed you. It sets the entire mood of your backyard. Here are three style-driven approaches.
Layout 10: Modern Farmhouse Symmetry
What it is: Two matching cedar 4×8 beds, perfectly aligned, with a cream gravel path between.
Why it works: The repetition reads as intentional and high-end. It mimics the symmetry of restored 1800s kitchen gardens.
How to execute:
- Use 11-inch tall cedar beds from Frame It All or a DIY kit from Home Depot.
- Mulch with cream pea gravel.
- Anchor each bed corner with a black metal obelisk for vertical interest.
Layout 11: Japandi-Inspired Minimal Beds
What it is: A single long, low galvanized bed (2 feet by 8 feet, 12 inches tall) planted with restraint.
Why it works: The Japandi style is about negative space. You plant fewer things, but each one earns its spot.
How to execute:
- 1 row of dwarf basil along one side.
- 1 row of bush beans down the middle.
- 1 row of arugula on the other side.
- Mulch heavily with bark to keep visual lines clean.
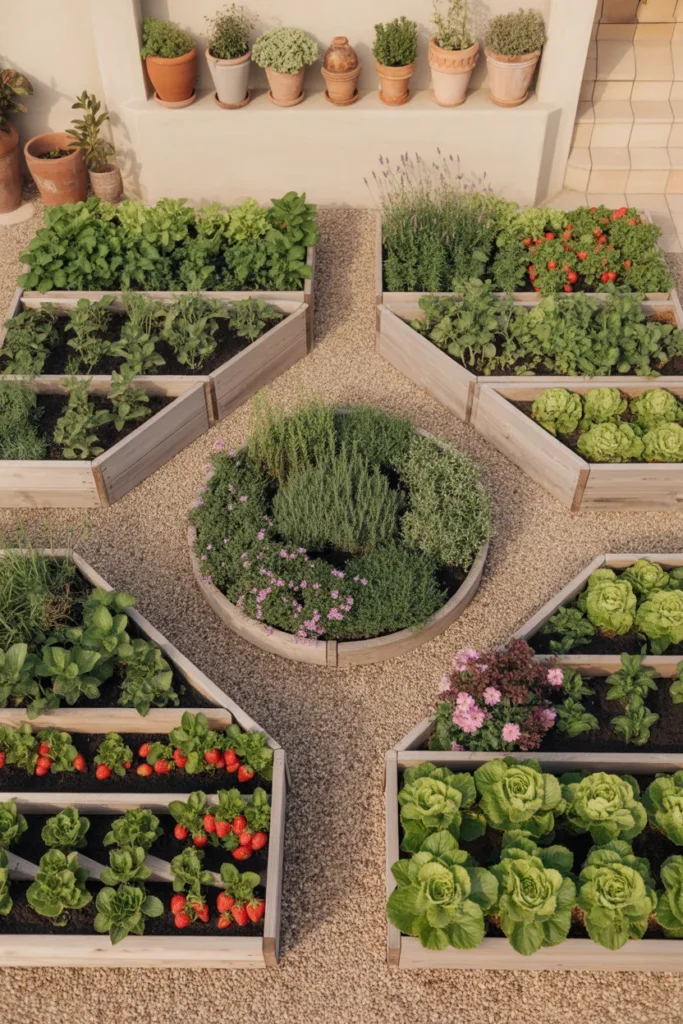
Layout 12: Cottagecore Potager (Splurge)
What it is: A circular or keyhole-shaped layout with a central fruit tree or herb spiral.
Why it works: It’s the Pinterest dream layout. Maximum lushness, maximum visual interest, perfect for small-backyard photography.
How to execute:
- Build 4 trapezoidal beds radiating around a central circular bed (like pie slices).
- Plant the center with a dwarf lemon tree (in zones 9+) or a tiered herb spiral.
- Surround with an under-planting of strawberries, lettuce, and edible flowers.
This one runs $400 to $800 if you DIY with cedar. Closer to $1,500+ if you buy pre-made trapezoidal kits from Vego or Williams Sonoma.
Renter-Friendly and Movable Layouts
If you’re renting, you need beds that move with you. Here are two layouts none of the top-ranking articles cover.
Layout 13: The Wheeled Trio
What it is: Three smaller galvanized beds (2 by 4 feet each) on heavy-duty caster wheels.
Why it works: No drilling, no digging, no permanent footprint. You can chase the sun across the yard or roll them onto the patio.
How to execute:
- Pick 17-inch tall galvanized beds (Vego, Olle, or Land Guard from Amazon).
- Bolt 4 locking caster wheels rated for 200+ pounds to the bottom of each.
- Line the bottom with landscape fabric, fill with a mix of bagged topsoil and compost.
Total cost: roughly $180 to $260 for all three beds and wheels combined. That’s mid-range and movable.
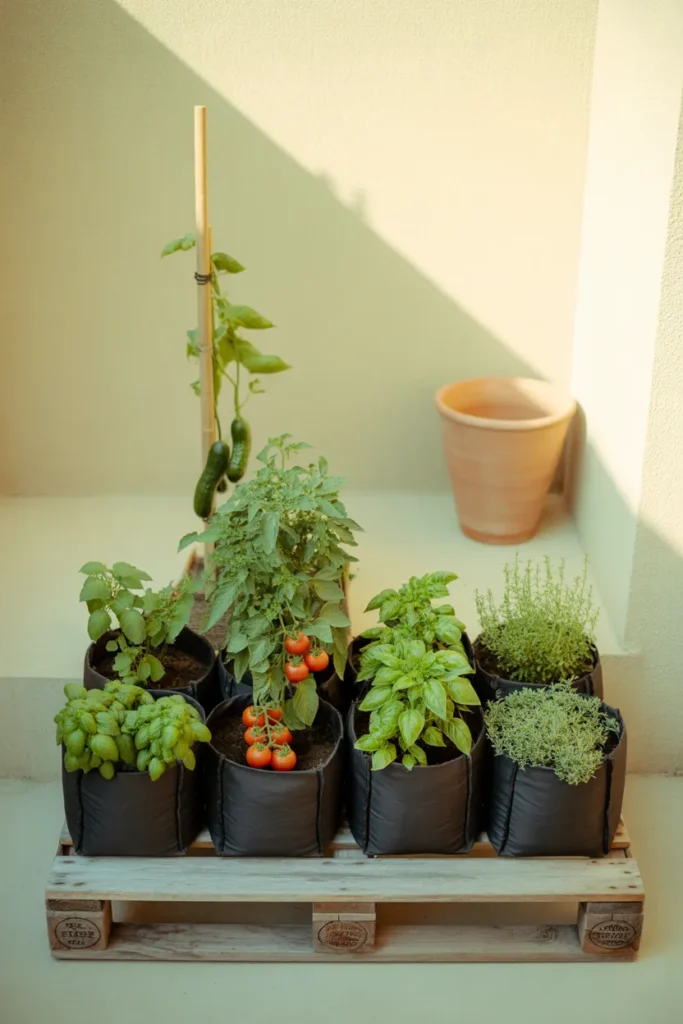
Layout 14: The Patio Container Grid
What it is: Six fabric grow bags or 5-gallon buckets arranged in a 2 by 3 grid on a patio.
Why it works: Truly zero footprint on the lawn. Perfect for renters with patios as small as 6 feet by 8 feet.
How to execute:
- Use 7- to 10-gallon fabric grow bags (Smart Pots are the gold standard, around $8 each).
- Place them on a low wooden pallet for drainage.
- Plant: 2 tomatoes, 2 peppers, 1 cucumber on a small trellis, 1 mixed herb bag.
For more no-budget builds, our roundup of cheap raised garden bed ideas breaks down a dozen options under $50.
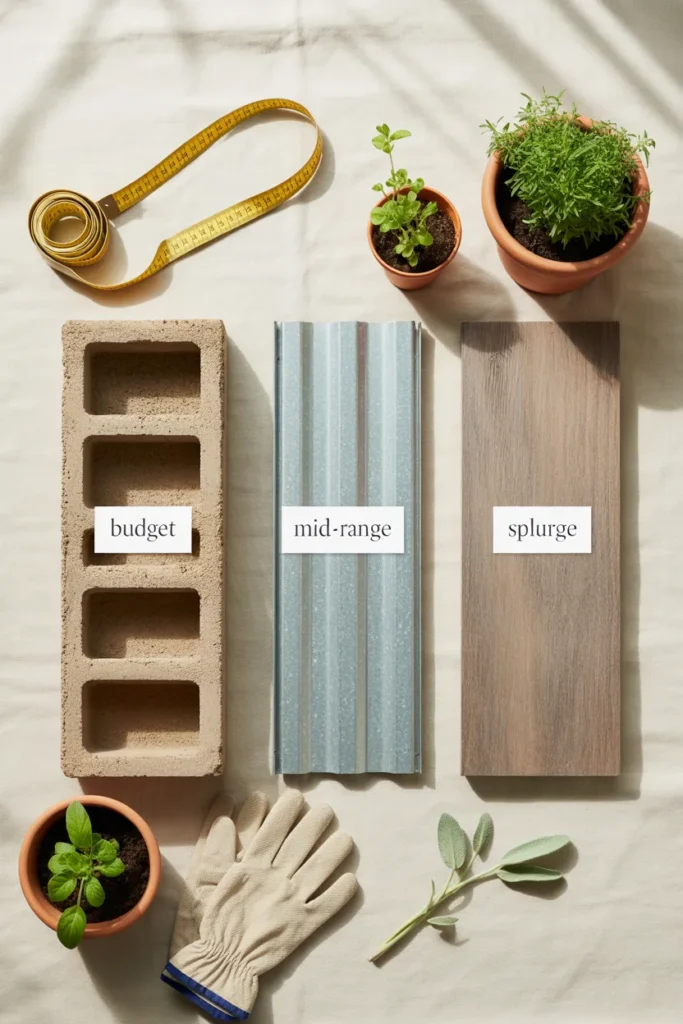
Budget vs Splurge Breakdown
Here’s the honest cost map I wish someone had given me when I started.
Budget-Friendly (Under $25 per bed)
- Material: Cinder blocks (8 cents to $2 each at Home Depot or Lowe’s), pallet wood, or 50-gallon stock tanks from Tractor Supply.
- Layout fit: Salad Bar Grid, Patio Container Grid.
- Real talk: These work. They don’t last more than 3 to 5 seasons, but they grow the same lettuce.
Mid-Range ($25 to $100 per bed)
- Material: Galvanized steel beds (Land Guard, Olle, Quictent on Amazon, $50 to $90 for a 4×4).
- Layout fit: Salsa Square, Family Feeder, Wheeled Trio, Back-Wall Trellis.
- Real talk: This is the sweet spot. Long-lasting, easy to assemble, looks clean.
Splurge ($100 to $400+ per bed)
- Material: Premium cedar from Frame It All, Vego Garden, or West Elm’s outdoor garden line.
- Layout fit: Modern Farmhouse Symmetry, Cottagecore Potager, U-Shape Kitchen Garden.
- Real talk: Worth it if you’re staying in your home 5+ years and you want it to look magazine-ready.
For the actual planting side, our guide to the best vegetables for raised beds tells you which crops give the highest return per square foot.
Companion Planting Cheat Sheet for Small Beds
This is the cheat sheet I hand to every friend who texts me a panicked photo of their raised bed.
Plant together:
- Tomatoes + basil + carrots + marigolds
- Peppers + onions + spinach + lettuce
- Beans + corn + squash (the classic Three Sisters, scaled down)
- Cucumbers + radishes + dill
Keep apart:
- Tomatoes and brassicas (broccoli, cabbage, kale fight tomatoes for nutrients)
- Beans and onions (onions stunt bean growth)
- Cucumbers and potatoes
- Fennel away from everything (it’s the loner of the garden)
Common Mistakes to Avoid
These are the mistakes I see in every single small-backyard layout I get tagged in on Pinterest.
- Building too narrow paths. Anything under 24 inches between beds and you can’t kneel, weed, or get a wheelbarrow through.
- Going too deep on the bed. A 4-foot-wide bed is the maximum. Anything wider and you can’t reach the center without stepping in.
- Ignoring sun direction. Tall plants on the south side of the bed will shade everything else by July.
- Planting too much. A 4×8 bed cannot handle 6 tomato plants. Two is the right number.
- Skipping mulch. Bare soil bakes, weeds win, and you give up by August.
- Forgetting succession planting. Pull the spent lettuce in June and plant beans in the same square. Don’t let real estate sit empty.
- Watering from above. It splashes soil onto leaves and spreads disease. Drip irrigation or a soaker hose changes everything.
How to Pick the Right Layout for Your Backyard
Quick decision tree:
- Yard under 200 square feet? Go with the Patio Container Grid or Wheeled Trio.
- Yard 200 to 350 square feet? One 4×4 or 4×8 bed using the Salsa Square or Family Feeder layout.
- Yard 350 to 500 square feet? Parallel Twins or U-Shape Kitchen Garden.
- Renting? Wheeled Trio or Back-Wall Trellis.
- Want it to look magazine-worthy? Modern Farmhouse Symmetry or Cottagecore Potager.
For the science behind raised bed soil depth and root crops, the University of Minnesota Extension has a solid free guide on planting and maintaining raised beds, and the USDA’s Plant Hardiness Zone Map is the first thing you should check before picking what to grow.
FAQ
How should I lay out my raised garden bed?
Start with sun exposure. Place the bed where it gets 6 to 8 hours of direct sun. Then divide it into squares (1 foot each), put tall crops on the north side, medium crops in the middle, and short crops on the south side. Add 2 to 3 flowering companions like marigolds or nasturtium per 4×8 bed.
What is the 70/30 rule in gardening?
You dedicate 70 percent of your bed to vegetables and herbs you’ll definitely eat, and 30 percent to flowers, pollinator plants, and experimental crops. It keeps the bed productive while still attracting pollinators and pulling pests away from your edibles.
What should not be planted in a raised garden bed?
Skip plants with aggressive root systems or that need huge spread: full-size pumpkins, watermelon, corn (in beds smaller than 8×8), Jerusalem artichokes, and mint (it will take over the entire bed in one season). Plant mint in a separate container instead.
How far apart should my raised garden beds be?
Leave at least 24 inches between beds for foot traffic. If you want to push a wheelbarrow through or kneel comfortably, go 36 to 48 inches. For the parallel twins layout, 4 feet is the magic number.
How do I do this in a small space or rental?
Pick the Wheeled Trio or Patio Container Grid. Both use galvanized beds or fabric grow bags that move with you, require no drilling, and leave zero permanent footprint. A Vego or Land Guard 17-inch galvanized bed on caster wheels travels to any future home.
What is the budget version of any of these layouts?
The Salad Bar Grid in a stack of cinder blocks (under $25 total) or the Patio Container Grid in 7-gallon fabric grow bags (around $50 for six bags) gives you the same growing power as a $300 cedar bed. The plants don’t know the difference.
How long does it take to build and plant a small-backyard raised bed layout?
Plan on one weekend total. Saturday: assemble the bed (1 to 3 hours for a galvanized kit, 4 to 6 hours for a DIY cedar build) and fill it with soil. Sunday: lay out your grid with twine, plant your starts, water deeply, and mulch. By Sunday night, you’re done.
Save This for Your Next Yard Day
The right layout takes a 4×8 raised bed from “okay, I grew some basil” to “we ate from this thing every night in July.” Pick the layout that fits your yard size, your budget, and how much you actually plan to cook.
Save the pin below so it lives in your gardening board, then come back next weekend with a tape measure. Sun-map first, sketch second, plant third. That’s the order that works every single time.


