

Stone Raised Garden Bed Ideas That Look Expensive (No Mortar, No Contractor)
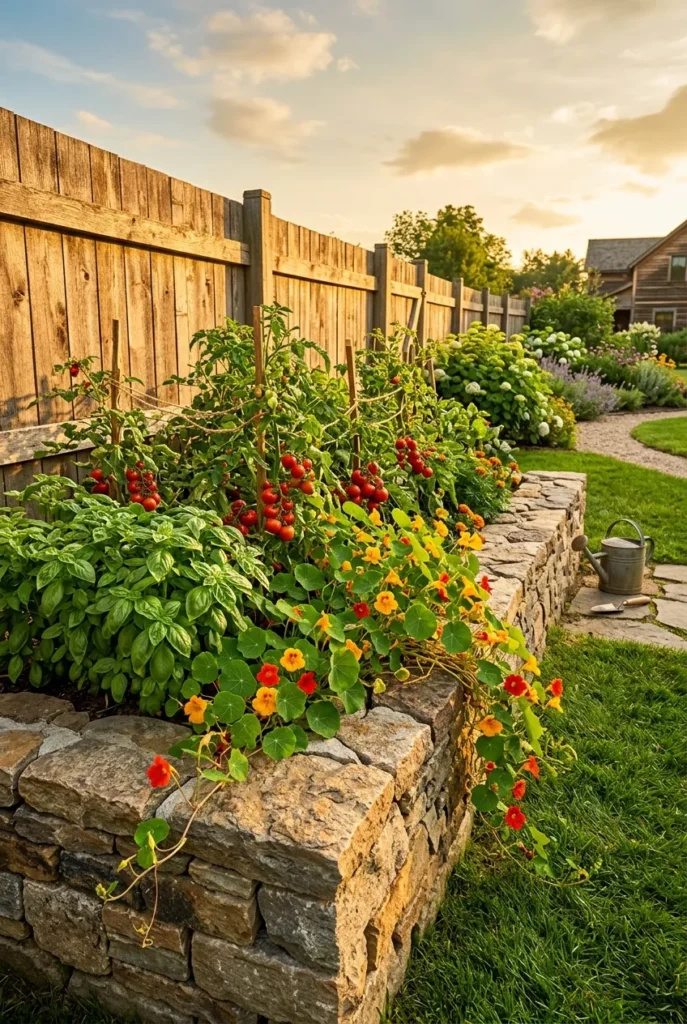
A stone raised garden bed is one of those backyard projects that looks like you hired someone. You didn’t. The whole thing stacks together without a drop of mortar, costs less than most cedar kit beds from Home Depot, and looks better every single season. Stone doesn’t rot in Zone 5 winters. It doesn’t rust at the seams after a wet spring.
And a fieldstone or flagstone bed stacked 12 inches high against your back fence will still be standing when your grandkids are out there picking cherry tomatoes. If you’re weighing your options and already looking at mortar-free builds, our brick raised garden bed guide breaks down the formal masonry route if you want a more structured, permanent look.
This guide covers 6 stone types compared by cost and DIY difficulty, a step-by-step no-mortar stacking method, placement ideas for along the fence, against the house, and right on a concrete patio, and a screenshot-worthy comparison table to help you pick the right material before you spend a dollar at the garden center.
Why Stone Raised Garden Beds Actually Last (And Every Other Material Eventually Doesn’t)
Wood is the classic starting point. My first raised bed was a Greenes Fence cedar kit from Home Depot at $89. It looked great for three seasons before the corner joints started separating and the bottom boards went soft. Cedar lasts 8 to 12 years depending on your climate. In Zone 6, with wet springs and hot summers, most cedar beds land closer to 7. Pressure-treated lumber runs longer but raises questions about chemical leaching into food crop soil, so most serious kitchen gardeners skip it.
Metal is the current Pinterest darling. A Vego Garden 17-inch metal raised bed runs $169 to $299 and carries a 20-plus-year rating. My Vego Garden metal bed heated up so much in July that the basil on the south edge bolted by the third week. Thin-gauge galvanized steel transfers heat directly into the root zone during peak summer in Zones 7 and above, which vegetables like lettuce and shallow-rooted herbs absolutely hate.
Stone is the long game. Properly laid dry-stack stone beds can last 50 years or more. Stone has higher thermal mass than metal or wood, which means it absorbs heat slowly during the day and releases it gradually at night. Soil temperatures stay more consistent, which benefits tomatoes, peppers, and root vegetables across Zones 5 through 9. Stone is also food-safe with zero chemical transfer concern. The trade-offs are upfront material weight and the physical effort of placement. Both are manageable. Neither should stop you.
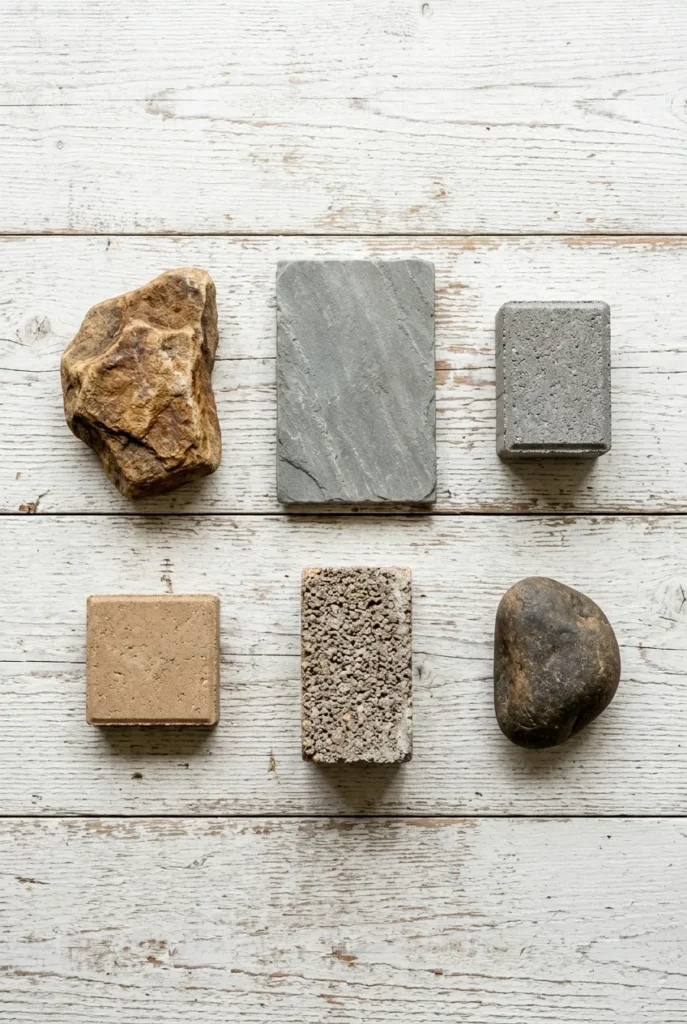
The Best Stone Types for a No-Mortar Stone Raised Garden Bed
Not all stone stacks the same way. Some types are a dream for a first build. Others will migrate outward the first freeze-thaw cycle hits. Here’s what you’re actually choosing between:
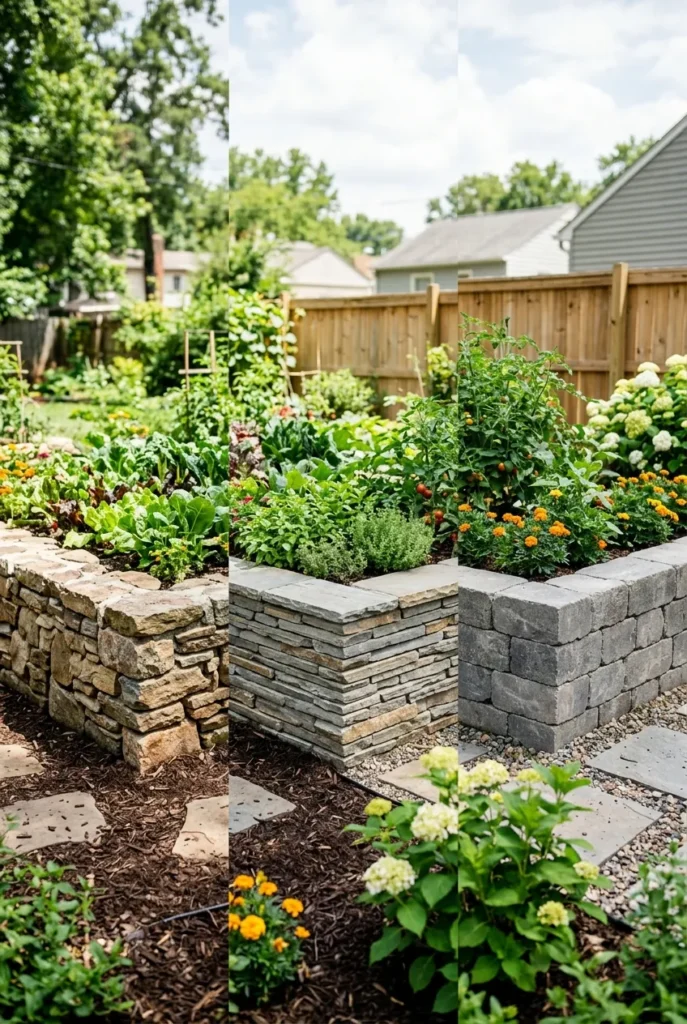
Field Stone
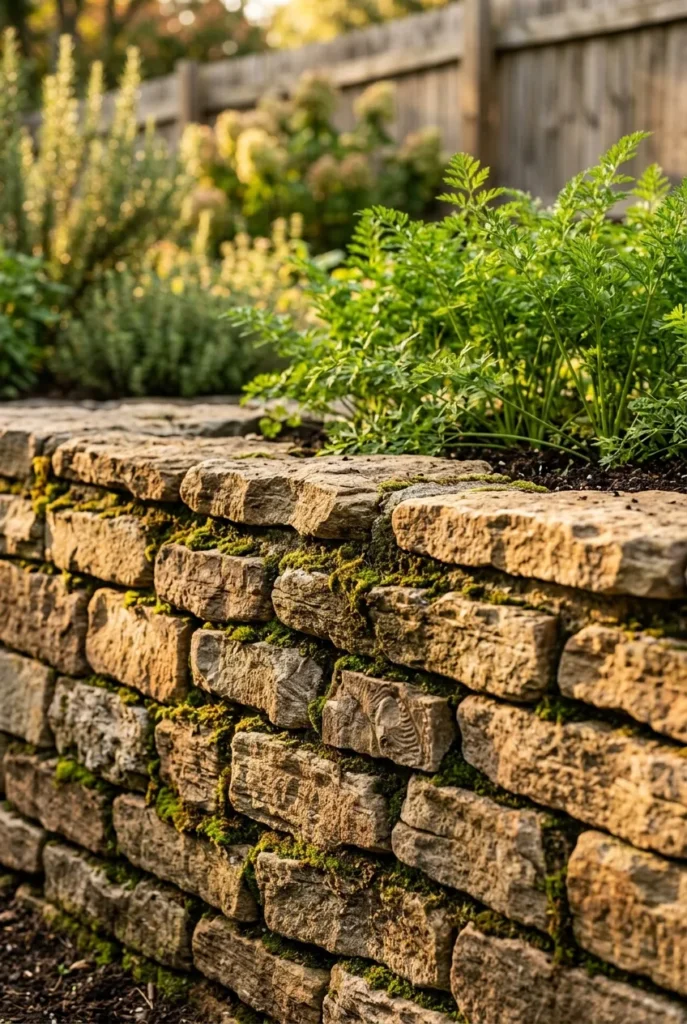
Field stone is the most naturally beautiful option and the least predictable to stack. It comes from excavated yards, old farm walls, or landscape supply yards, typically $120 to $200 per ton. The irregular shapes lock together like a puzzle when done right, but they’re unforgiving if you rush the base course. A single misaligned stone at the bottom shifts the whole wall. Field stone beds look incredible against a wooden fence in a cottage or naturalistic garden. Plan for 2 to 3 weekends to build a 4×8 bed to 12-inch height.
Flagstone
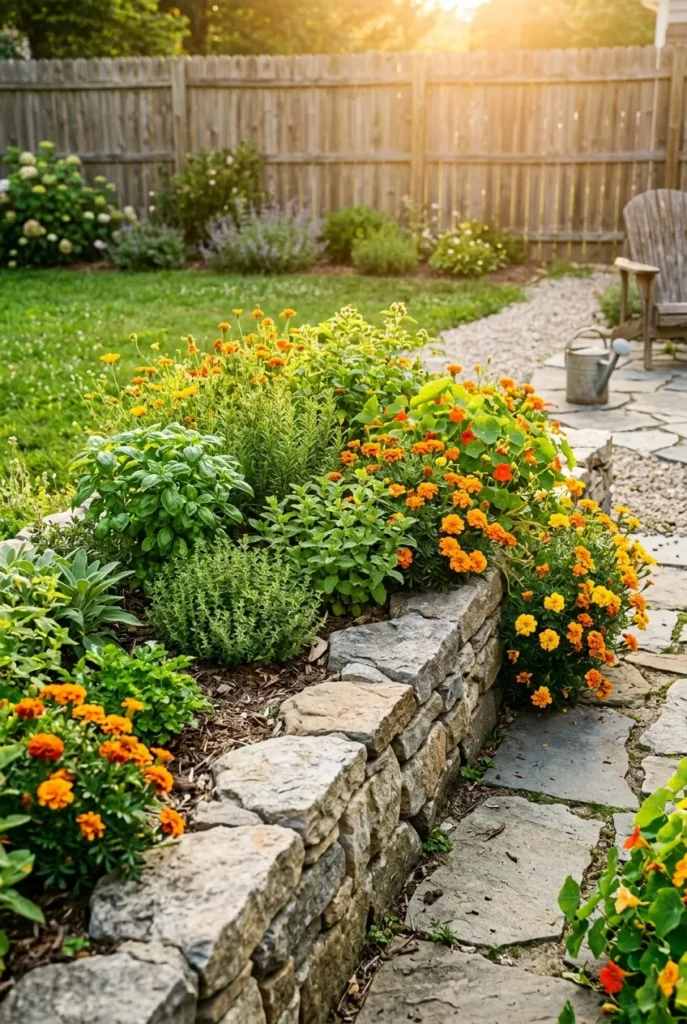
Flagstone stacks more predictably because the flat, layered structure lets you build level courses. Lowe’s and Home Depot carry patio flagstone ranging from $0.25 to $0.60 per pound, which runs roughly $200 to $350 for a standard 4×8 bed at 12 inches. Each piece is thinner, so you need 4 to 5 courses to reach height. Flagstone beds have a refined, almost Mediterranean look that pairs beautifully with rosemary, lavender, and trailing thyme spilling over the edges.
Retaining Wall Block
This is the easiest no-mortar option. Retaining wall blocks are engineered specifically for dry-stacking. Home Depot carries the RumbleStone 3.5-inch block at about $2.50 each. A 4×8 bed built to 12 inches needs roughly 80 to 100 blocks, landing between $200 and $250. Each block weighs about 12 pounds and some styles interlock with a built-in setback angle that holds the wall stable through freeze-thaw cycles in Zones 4 through 7. If you’ve never dry-stacked before, start here.
How to Build a Stacked Stone Raised Garden Bed (No Mortar, No Permits)
You don’t need a contractor. You need a weekend, a 4-foot level, and someone to help with the heavier pieces.
Step 1: Mark the footprint and prep the base. Clear the area completely. Dig down 2 to 3 inches and fill with compacted pea gravel or 3/4-inch crushed stone. This single step prevents more wall failures than anything else. According to Penn State Extension’s research on raised bed drainage and base preparation, poor drainage under the base course is the primary driver of frost heave movement in no-mortar stone structures. A gravel base lets water move through freely instead of pooling and freezing against the bottom stones.
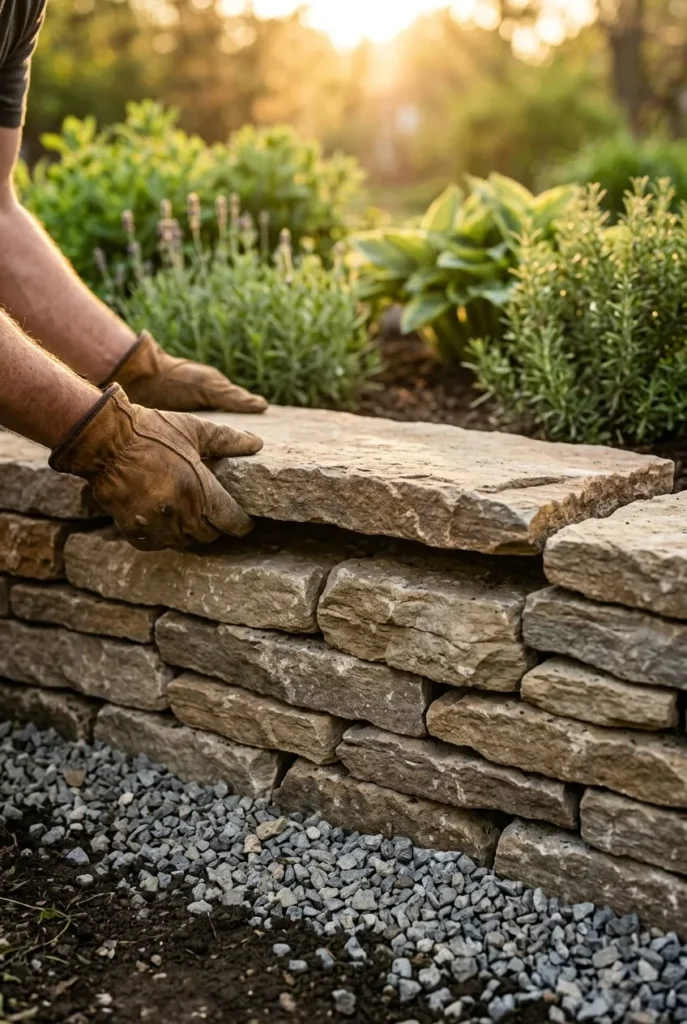
Step 2: Set the first course below grade. Lay your bottom stone course so it sits slightly below the gravel surface. This course carries everything. Use a rubber mallet to seat each piece firmly, and check level in both directions before moving on.
Step 3: Stack in staggered, offset courses. Each stone’s vertical joint should fall over the center of the stone below, the same offset pattern as brickwork. This prevents the wall from splitting along a single continuous seam under soil pressure. Lean each course very slightly inward (about half an inch of setback per foot of height) to add gravity-based stability without any mortar.
Step 4: Backfill as you build. Add soil behind each completed course rather than waiting until the wall is fully stacked. The weight of soil pressing against the back of the stone wall actually increases stability, and it’s dramatically harder to fill retroactively once you’ve capped the top.
Step 5: Cap with your best pieces. Save your flattest, most attractive stones for the top course. These stay visible all season and take the most handling when you’re weeding and harvesting. Cap stones should overhang the course below by about half an inch on each side.
Stone Raised Garden Bed Placement Ideas (Fence, House, Patio)
Here’s the angle most guides skip. They tell you how to build a stone bed but not where to put it. Placement changes how the bed drains, how it performs thermally, and how it looks from the house.
Along the Fence
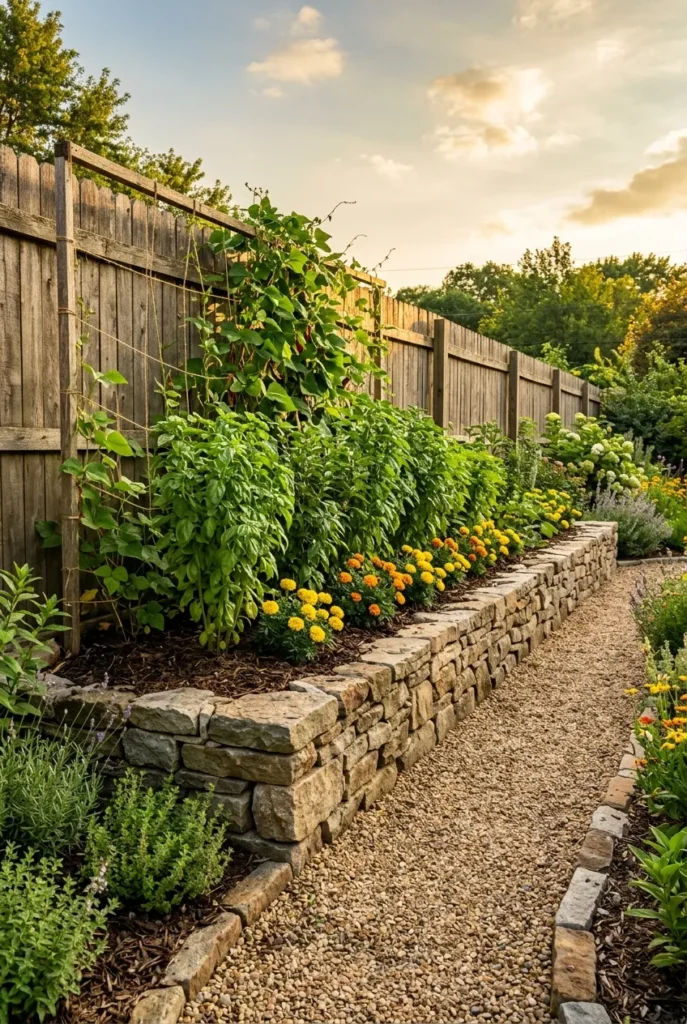
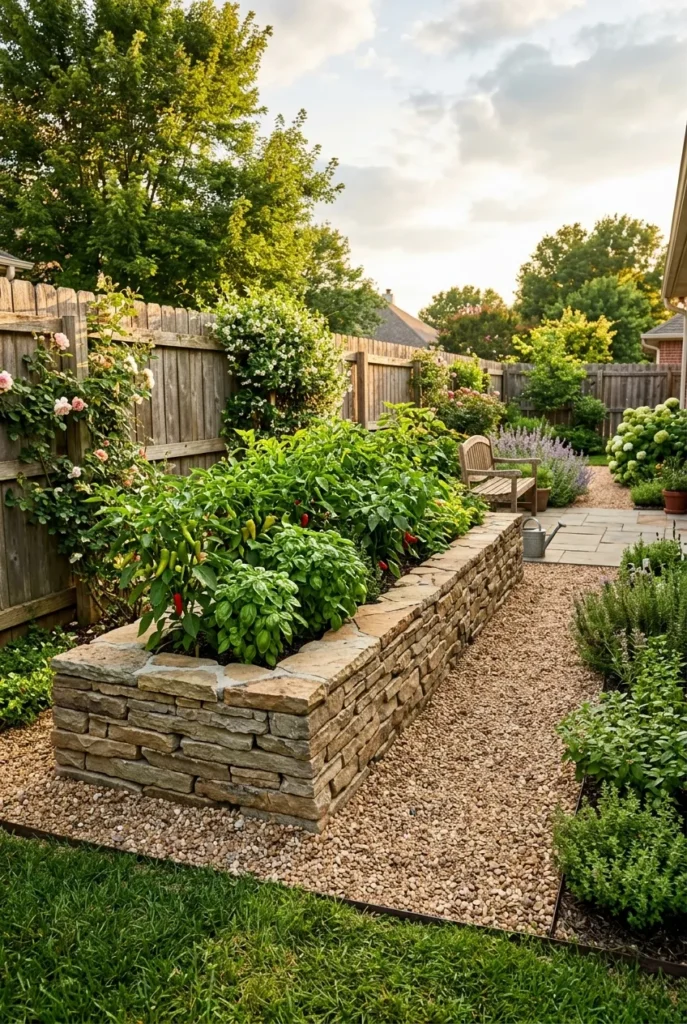
A stone raised garden bed running along the back fence line is a layout classic for good reason. The fence acts as a natural backdrop for climbing plants like pole beans, cucumber vines, and climbing roses. Keep 6 to 8 inches of clearance between the stone wall and the fence boards to allow airflow and prevent the wood from trapping moisture.
This placement works especially well for a stacked stone or retaining wall block design because the bed can run the full fence length and define a clear garden zone in a long, narrow backyard. If you’re planning more than one bed, our raised garden bed layout ideas for small yards has sun-mapped layout templates worth checking before you commit to placement.
Against the House
Beds placed against the foundation look intentional and architecturally grounded. Use a 6-inch gravel gap between the stone wall and the house foundation to prevent moisture buildup against the siding. Check that downspouts don’t discharge directly into the bed before you fill it. South-facing and west-facing walls capture radiant heat and can extend your growing season by 2 to 3 weeks in Zones 5 and 6. According to the USDA Plant Hardiness Zone Map, walls with southern exposure regularly create microclimates 1 to 2 zones warmer than the surrounding yard, which means you can push the frost margin on heat-lovers like basil and peppers by starting them against a stone-walled foundation bed.
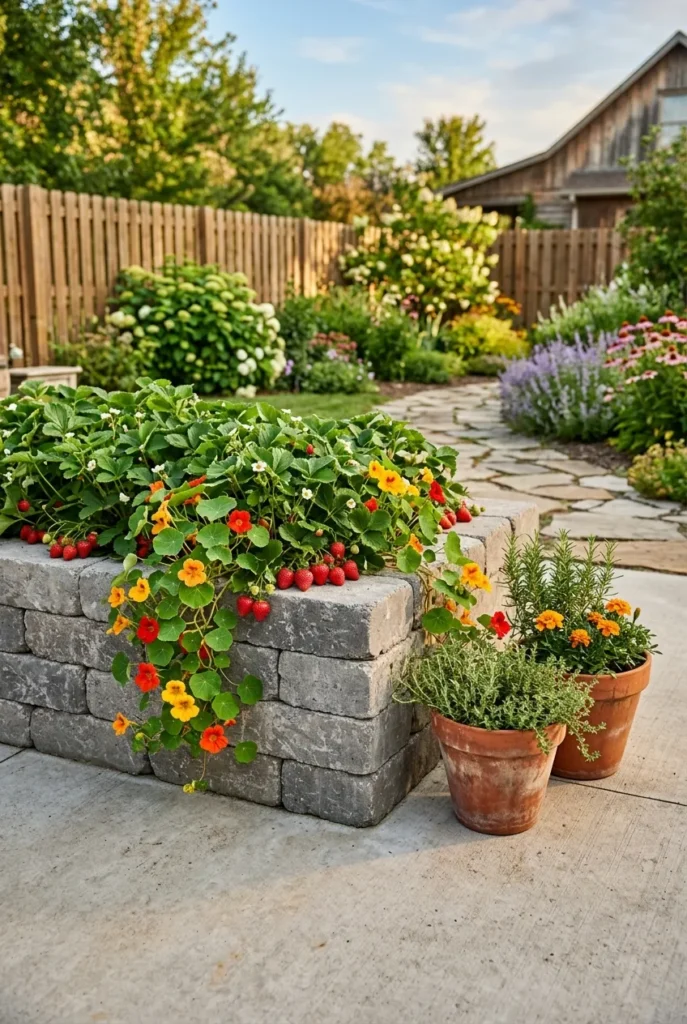
On a Patio or Concrete Surface
Placing a stone raised garden bed directly on concrete or a paver patio is smart for renters or anyone who doesn’t want to disturb the existing ground. A few adjustments are needed. Line the interior base with weed fabric so soil doesn’t wash out through the stone joints. Use a deeper soil column (12 inches minimum, 16 inches preferred) since there’s no in-ground root extension below the slab. Watering consistently matters more on a patio because concrete reflects heat and dries soil faster than a ground-level bed.
What to Fill Your Stone Raised Garden Bed With
The stone walls are the container. What you put inside determines whether your plants thrive by June or sit there looking confused until August.
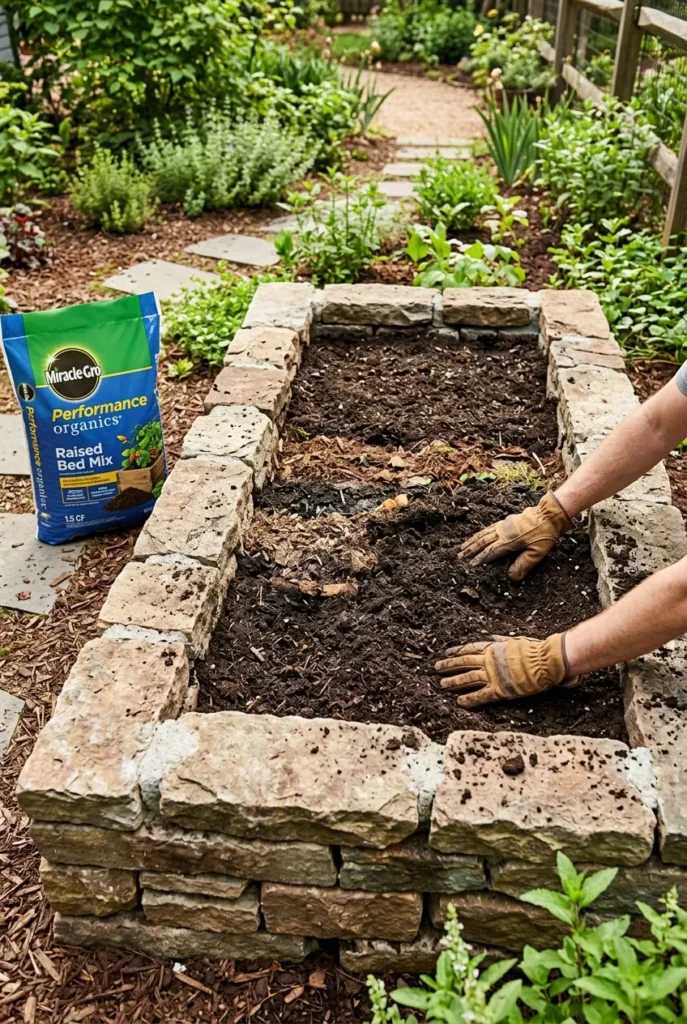
I filled my first 4×8 cedar bed with bagged Miracle-Gro alone and learned that swapping the bottom third for branches and leaves would have saved me $80 in material costs. The same layered approach applies to a stone bed. Start with 4 to 6 inches of rough organic material at the base (sticks, leaves, cardboard, wood chips). This breaks down slowly, adds drainage, and reduces how much expensive bagged mix you need.
For the top 8 to 10 inches where roots actually grow, aim for a blend of 60% quality raised bed soil, 30% compost, and 10% perlite or coarse sand. Miracle-Gro Performance Organics Raised Bed Mix ($18 per 1.5 cu ft, available at Lowe’s and Home Depot) is reliable and widely available. Kellogg Garden Patio Plus ($12 per 1.5 cu ft) runs slightly more budget-friendly and performs well in Zones 7 through 10. For a premium upgrade in a smaller stone planter bed, Coast of Maine Bumper Crop ($16 per 1 cu ft) adds real body and microorganism activity to the mix.
For a full breakdown of layering methods, ratios, and what to skip entirely, see the layered fill method for stone and wood raised garden beds on our site.
Stone Type Comparison Table (Screenshot This Before You Go to the Garden Center)
Prices below are 2026 US ballpark estimates for a 4×8 bed built to 12-inch height.
| Stone Type | Approx. Cost (4x8x12″) | DIY Difficulty | Best Aesthetic | Freeze-Thaw Stability |
|---|---|---|---|---|
| Field Stone | $120-$200 (sourced/salvaged) | Hard | Cottage, naturalistic | Moderate (irregular fit) |
| Flagstone | $200-$350 | Medium | Mediterranean, refined | Good (flat layers) |
| Retaining Wall Block | $200-$250 | Easy | Modern, clean | Excellent (engineered) |
| Paver Stone | $180-$300 | Easy-Medium | Formal, geometric | Good |
| Cinder Block | $60-$100 | Easiest | Industrial, paintable | Excellent |
| River Rock (stacked) | $150-$280 | Hard | Zen, naturalistic | Poor (round faces slip) |
River rock is the one I’d talk you out of for a no-mortar build. It photographs beautifully, and that’s exactly why it dominates Pinterest boards while performing terribly in actual backyards. Rounded faces have almost no friction surface between them. Soil pressure causes the wall to bow outward by midsummer. If you love the river rock aesthetic, use it as a mulch layer inside the bed or as path edging alongside a flagstone or retaining block wall. Save the structural work for stone with flat faces.
The Three Mistakes That Actually Ruin Stone Raised Beds
Most stone raised garden beds fail for three reasons. None of them have to do with the stone itself.
Mistake 1: Skipping the gravel base. Stacking directly onto grass or packed clay means frost heave will shift the bottom course every winter in Zones 5 through 7. Two to three inches of compacted gravel costs about $15 to $25 for a standard bed and prevents the whole wall from migrating after the first freeze. Worth every dollar.
Mistake 2: Using river rock for load-bearing courses. The photos are beautiful. The reality is a wall that leans outward by August because round stone surfaces have almost no friction grip against each other. Use river rock only for decorative cap layers or ground mulch, not for the structural stacked courses.
Mistake 3: Building over 18 inches tall without batter. Batter is the slight inward lean of a dry-stack wall. Without it, walls above 18 inches are fighting soil pressure with nothing but gravity. Add 1 inch of inward setback per 12 inches of height for any bed taller than a standard course stack. Keep no-mortar beds at 12 to 16 inches for the safest outcome.
Best Plants for a Stone Raised Garden Bed
Stone’s thermal mass makes it a better growing environment for heat-loving crops than wood or thin-gauge metal. Here’s what actually performs well against stone walls:
- Tomatoes (Bonnie Plants Better Boy or Cherokee Purple): 12-inch minimum bed depth, thrive in the even warmth stone holds overnight
- Peppers (Bonnie Plants California Wonder or Italian Frying): love the reflected warmth from a south-facing stone wall
- Herbs: basil, rosemary, thyme, and oregano all perform well in stone beds in Zones 6 through 9 because the stone holds daytime heat and releases it slowly after sunset
- Lettuce and spinach: plant these on the north or shaded end of a stone bed in Zones 7 and above, since stone can overheat shallow roots during July
- Strawberries: trail beautifully over the stone edge, look incredible in a flagstone or field stone bed, and genuinely love the drainage stone walls provide
The 18-inch-deep stone bed I built for carrots gave me the straightest harvest I have ever pulled. Partly because of the loose deep soil, but also because the stone walls protected the row from foot compaction when I walked nearby. Depth matters more than most guides admit. According to the Old Farmer’s Almanac’s raised bed planting guidance, most root vegetables need a minimum of 12 inches and carrots specifically need 16 to 18 inches for full root development without forking or stunting.
Frequently Asked Questions
Are stones good for garden beds?
Yes, stone is one of the best long-term materials for a raised garden bed. It doesn’t rot, doesn’t rust, doesn’t leach chemicals near food crops, and provides thermal mass that keeps soil temperatures more consistent than wood or metal. The trade-off is upfront weight and cost, but neither is a dealbreaker for a standard 4×8 or 4×10 backyard build.
What are three mistakes to avoid when gardening with raised beds?
For stone beds specifically: skipping the gravel base (leads to frost heave in Zones 4 through 7), using round river rock for structural courses (walls bow outward under soil pressure), and building over 18 inches without an inward batter angle (walls lean or collapse under wet soil weight). All three are fixable at the planning stage before you place a single stone.
Is it cheaper to build or buy a raised bed?
A DIY stone raised bed costs $60 to $350 depending on stone type and whether you source locally. A Greenes Fence cedar kit runs $60 to $140 at Home Depot. A Vego Garden metal bed runs $169 to $299. Stone costs roughly the same as metal upfront but lasts 3 to 5 times longer. Source field stone locally for free or at low salvage cost and a stone bed is the cheapest long-term option in almost any yard.
How do you make a raised garden bed with stones?
Lay a 2 to 3-inch compacted gravel base. Set the first stone course slightly below grade. Stack in offset, staggered courses where vertical joints never line up across rows. Add a slight inward lean of about half an inch per foot of height. Backfill with soil as you stack each course. Cap with your flattest, most attractive stones on top.
How tall should a stone raised garden bed be?
For vegetables, 12 inches is the workable minimum and 16 inches is the sweet spot for most crops. Carrots, parsnips, and deep-rooted herbs like tarragon need 18 inches. For flowers or shallow-rooted herbs, 8 to 10 inches is enough. Keep no-mortar dry-stack walls under 24 inches for safe structural stability without engineering help.
Do stone raised garden beds need drainage holes?
No. The natural gaps between stacked stones provide drainage without any drilling. On a concrete patio, line the interior base with landscape fabric to keep soil from washing out between the joints, and set the bed over a thin gravel layer for additional drainage.
Can I build a stone raised garden bed on a slope?
Yes, and a sloped site actually suits stone well. Step the base course to follow the natural grade rather than trying to level an entire frame. Terrace the slope with two or three step-down stone beds for a classic European kitchen garden look that also controls erosion naturally.
You’ve Got the Stone. Now Go Build.
A stone raised garden bed is one of the most rewarding weekend builds in any backyard. The materials are real, the work is physical, and the result looks like it’s been there for decades. Pick retaining wall blocks if you want the easiest no-mortar start. Go with field stone if you want the most beautiful result and don’t mind the puzzle. Either way, get that gravel base down first.
For budget-first builders, cheap raised garden bed ideas under $50 covers cinder block and salvage stone builds that cost almost nothing and still look sharp. And if this is your first raised bed of any material, our raised garden beds for beginners guide walks through spacing, soil depth, and what to plant first so the whole thing pays off by midsummer.


