

The first summer I hung G40 globes, I screwed hooks straight into a cedar fence post and the strand sagged by Memorial Day. A 2 mm guide wire fixed it overnight, but it taught me the real lesson: most backyards don’t have enough anchor points, and drilling into rental fences is a security deposit gamble. So you build poles. The right kind of pole, in the right kind of base, lasts six summers and survives a thunderstorm.
The wrong kind tips into your neighbor’s hydrangea the first Saturday of June. This guide walks through five DIY string light pole builds, the cement-or-planter base math, and a $87 weekend build that I have actually used on my own patio. You’ll get a cost breakdown, a material comparison, and the no-drill base that holds up in 30 mph wind of DIY String Light Poles.
Why Backyards Without Trees Need DIY Poles
Half of all American backyards do not have a tree or pergola positioned where the light actually needs to go. Concrete pads, new builds, narrow side yards, balconies, and rental patios all share the same problem: you want the warm glow, but you have nothing tall to hang it from. Store-bought string light poles do exist (Hampton Bay sells a 12 ft pole for around $35 at Home Depot), and they work fine. But four of them cost $140 and they look like four identical store-bought poles. DIY poles cost less, look better, and let you build the exact height your lights need.
The other reason: drilling. If you rent, you cannot put hooks in the siding without risking your deposit. If you own, your fence post is probably not in the right spot for where you want the light to land. Freestanding poles solve both problems. They go where you want, they come up when you mow, and they store flat in the garage off-season.
For the bigger picture of how poles fit into a budget patio, our 25 backyard patio ideas on a budget post lays out the framework I use every spring. Poles are the cheapest single upgrade in that whole list.
The Five DIY String Light Pole Builds (Ranked by Cost)
Five builds, all weekend projects, all under $50 per pole. Each one solves a different problem.
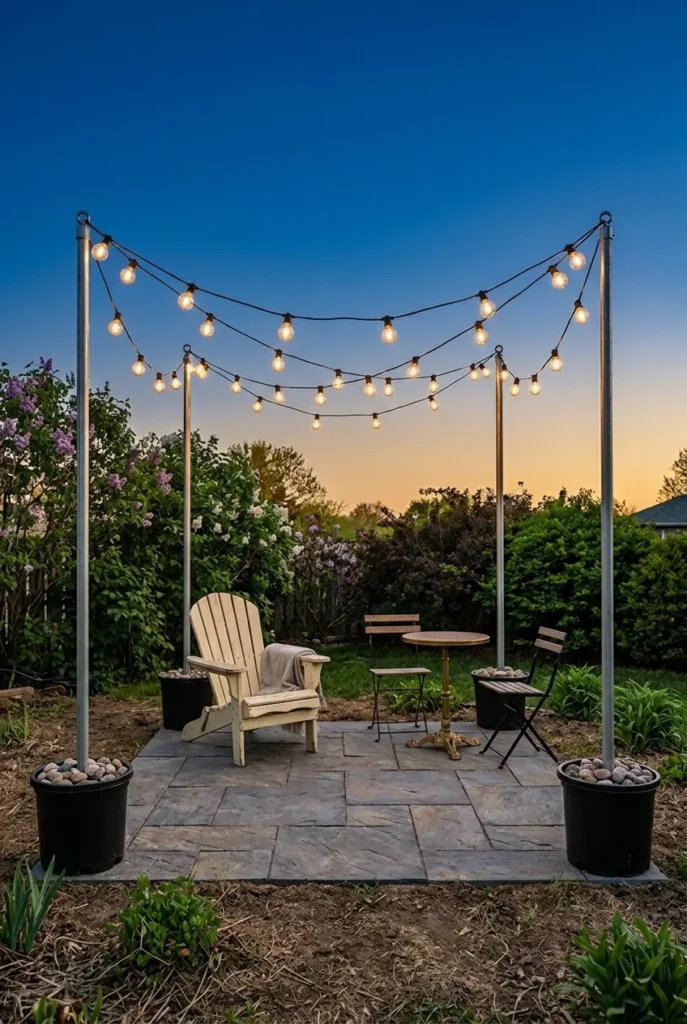
1. The 5-Gallon Planter Pole ($18 per pole)
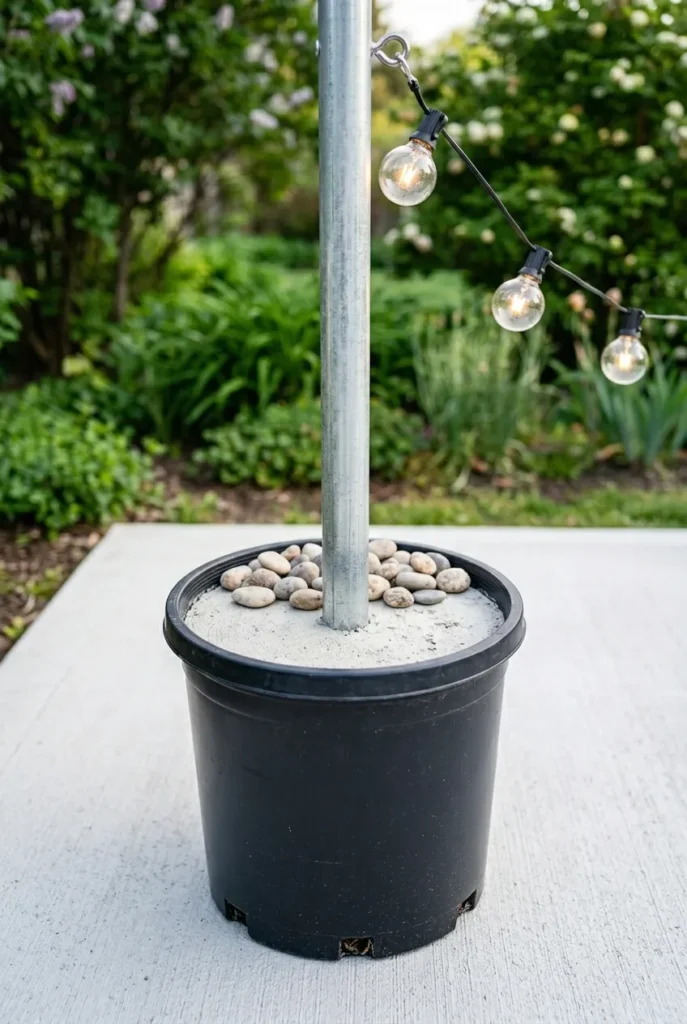
This is the build I recommend first to anyone with a deck, patio, or balcony. You drop a length of galvanized EMT conduit or a 4×4 cedar post into a 5-gallon black plastic planter, fill the planter with 60 lb of Quikrete, let it set, and top with river rock or potting soil planted with a trailing vine. The planter looks intentional. The base is heavy enough to stay put. The whole pole comes up and moves with you.
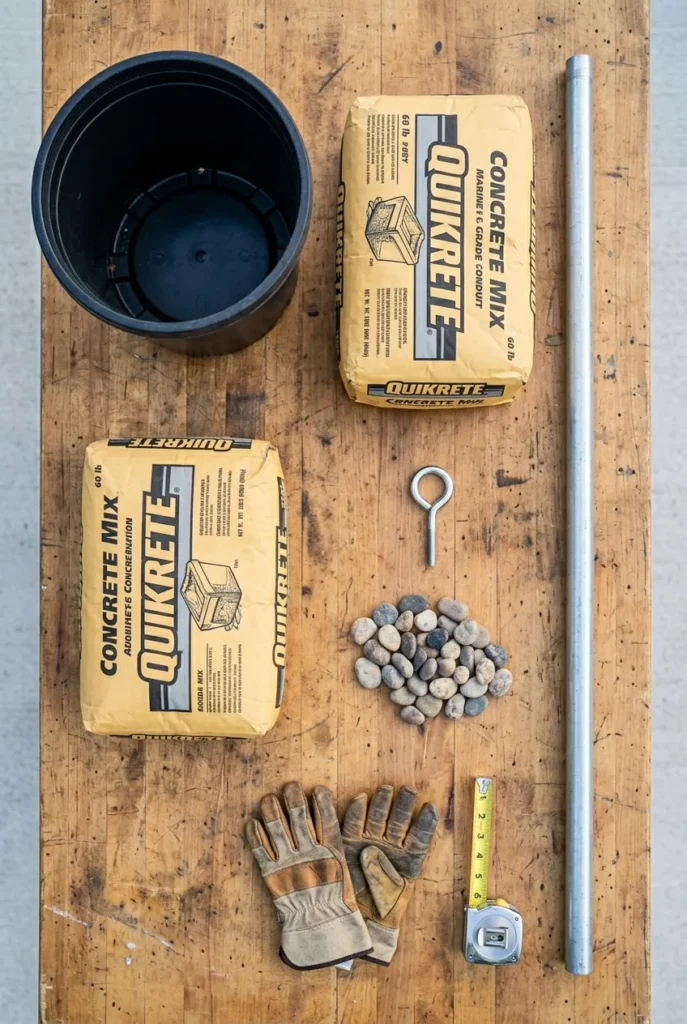
Materials per pole: one 10 ft length of 3/4 inch galvanized EMT conduit ($12 at Home Depot), one 5-gallon nursery pot ($4), one 60 lb bag of Quikrete fast-setting concrete ($7), one marine-grade eye hook ($2). Total: $25, but you can pull it down to $18 if you reuse an old plastic planter from the garage.
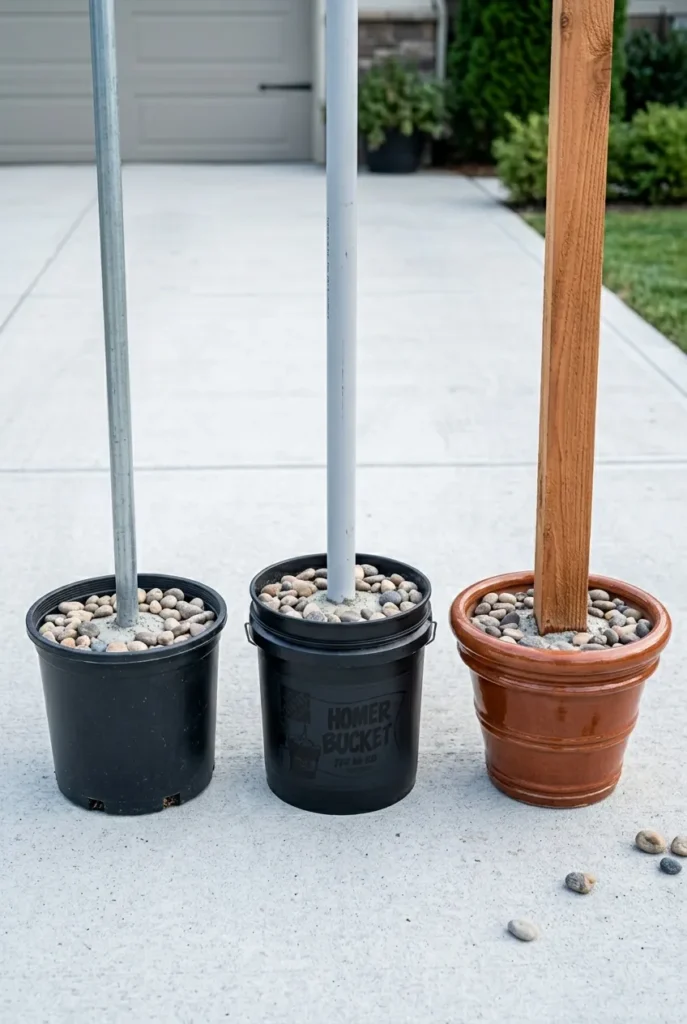
2. The Bucket Pole ($14 per pole)
Same idea, cheaper container. A 5-gallon Home Depot Homer bucket painted matte black or wrapped in jute rope. Less pretty than a real planter but four bucket poles cost $56 total versus the $76 you’d spend on Hampton Bay. The bucket option is what most YouTube tutorials show because the build is foolproof.
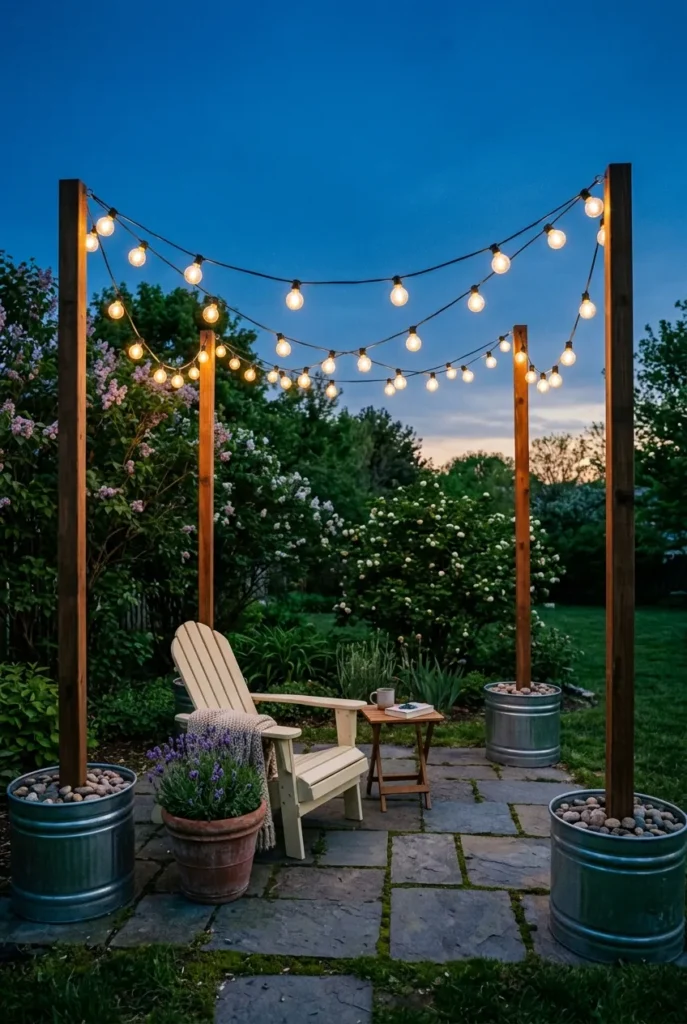
3. The 4×4 Cedar Post in a Planter ($32 per pole)
For a more substantial, intentional look, swap the conduit for a pressure-treated 4x4x8 cedar post ($14 to $22 at Lowe’s). The wider profile reads as architectural, not utilitarian. Anchor in a 16-inch diameter ceramic or fiberglass planter with 80 lb of concrete. Cedar weathers to a soft gray over two seasons and looks like it belongs in a Magnolia spread.
4. The PVC Pole (Cheapest, $9 per pole)
Pinterest autocomplete keeps surfacing “PVC” for a reason. A 10 ft length of 1.5 inch PVC pipe runs $8 at any hardware store. Anchor in concrete same as the planter build. The catch: PVC is not UV stable. Even gray pipe yellows and gets brittle after two summers of direct sun. I would only use PVC for a wedding or one-season camping setup. For a permanent patio, skip it.
5. The Existing Fence Post Extender ($16 per pole)
If you already have a chain-link or wood fence with corner posts, you can extend them upward with a piece of EMT conduit clamped to the existing post using two stainless hose clamps and a wood block as a shim. This is my favorite hack for narrow side yards where there is literally no floor space for a planter. The extender gives you another 4 ft of height. For more narrow yard tricks like this, our cozy backyard ideas under $200 post has the full layout playbook.
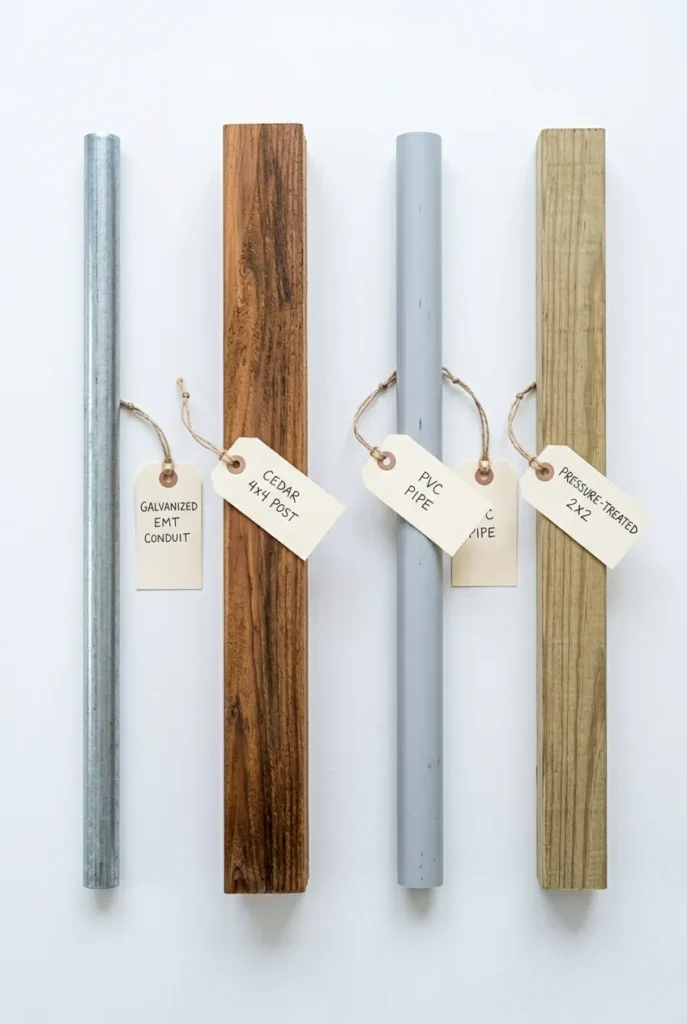
The Material Comparison Table (Screenshot This One)
Here’s the only chart that matters when you’re standing in the Home Depot aisle.
| Pole Material | Upfront Cost (per pole) | Lifespan | Best Use |
|---|---|---|---|
| Galvanized EMT conduit | $12 to $15 | 8+ years | Permanent patio, urban setup, sleek modern look |
| 4×4 cedar post | $22 to $32 | 5 to 7 years | Cottage aesthetic, wider yards, weathered farmhouse vibe |
| PVC pipe (1.5 inch) | $8 to $10 | 1 to 2 seasons | One-time wedding, party setup, indoor or temporary |
| Pressure-treated 2×2 | $6 to $9 | 2 to 4 years | Budget pole for a single season, paint required |
| Repurposed metal pipe | Free to $5 | 5+ years | Salvaged build, industrial look, requires rust-proof paint |
For most backyards, EMT conduit is the right answer. It is cheap, it does not rot, it does not yellow in the sun, and the 3/4 inch diameter is just enough to look intentional without being chunky. The 4×4 cedar wins on looks if you have the space.
How Deep to Anchor a Pole (The Math Nobody Else Gives You)
This is the gap angle. Every other guide tells you to “use concrete.” None of them tell you how much. Here’s the actual rule.
For a freestanding planter or bucket pole carrying a single string of G40 lights:
- A 5-gallon planter (roughly 12 inches diameter, 14 inches deep) filled to within 2 inches of the rim with Quikrete weighs about 75 lb when set. That is enough mass to hold a 10 ft pole upright in winds up to 25 mph.
- For a 12 ft pole, step up to a 7-gallon planter (about 14 inches diameter) and 90 lb of concrete.
- For two strings crossing at one pole, double the base weight. The diagonal load is no joke.
For a buried 4×4 cedar post (not freestanding, actually dug into the ground):
- Minimum hole depth is 24 inches in warm climates (Zones 8 to 10). In freeze zones (Zones 3 to 6), dig to your local frost line, which is typically 36 to 48 inches. The Old Farmer’s Almanac frost line chart at almanac.com is the easiest reference.
- A 4×4 buried 30 inches with 50 lb of Quikrete around it will hold a string light load through any normal storm.
- ENERGY STAR’s outdoor electrical guidance reminds you that any wiring run between poles needs to stay above the recommended height and use GFCI protection. The ENERGY STAR guide for outdoor lighting is worth a five-minute read before you finalize your run.
Contrarian opinion: most DIYers way over-engineer the base. You do not need 200 lb of concrete for a single string of lights. That is what I built my first poles with and the planters were so heavy I could not move them when winter came. Stick to the weights above. They are enough.

Step-by-Step: Building the Planter Pole in Under an Hour
Here is the actual weekend build. I have done this six times and the timing holds.
- Pick your spot. Mark where each pole goes. Measure the distance between poles. For G40 globes on a Brightech Ambience Pro 48 ft strand ($45 on Amazon), the sag looks best when poles are 18 to 22 ft apart.
- Cut the conduit to height. Most patio setups want a 10 ft finished pole height. EMT conduit comes in 10 ft lengths, so usually no cutting needed. If you bought a 4×4, cut to 10 ft with a circular saw.
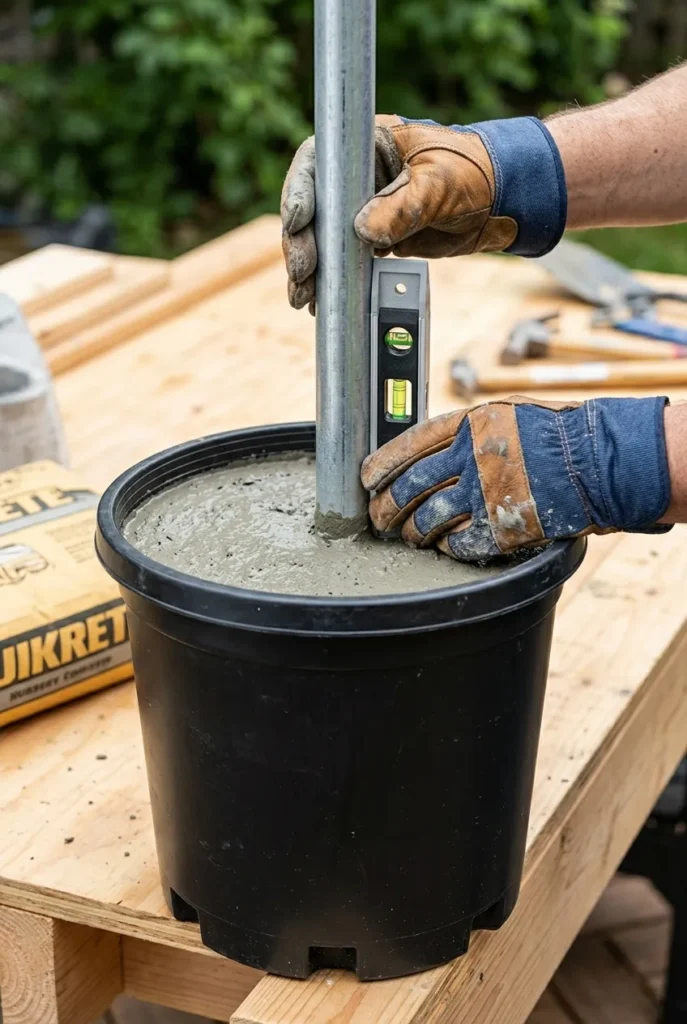
- Drop the pole in the planter. Center it. Have someone hold it plumb (use a small bubble level taped to the pole) while you mix concrete.
- Mix the Quikrete. Fast-setting Quikrete needs about 0.5 gallon of water per 60 lb bag. Mix in a wheelbarrow or pour dry into the planter, then add water slowly. Dry-pour method works if you accept slightly less strength.
- Fill to within 2 inches of the rim. Tap the planter sides to release air bubbles. Check plumb one more time. Walk away.
- Wait 24 hours. Quikrete fast-set is technically solid in 20 to 40 minutes but full cure takes a day. Do not load the pole until it is fully set.
- Top with river rock or potting soil. River rock is cleaner. Potting soil with a trailing vine like sweet potato vine or trailing petunia hides the concrete and makes the pole look like a planter.
- Install the eye hook. Drill a small pilot hole in the cedar (skip this step for EMT, since the conduit is hollow and you use a U-clamp at the top instead). Screw in the marine-grade eye hook.
- String the lights. Use a guide wire (2 mm aircraft cable, $14 at Home Depot) between far-apart poles to prevent sag. Clip the string lights to the guide wire with simple zip ties every 18 inches.
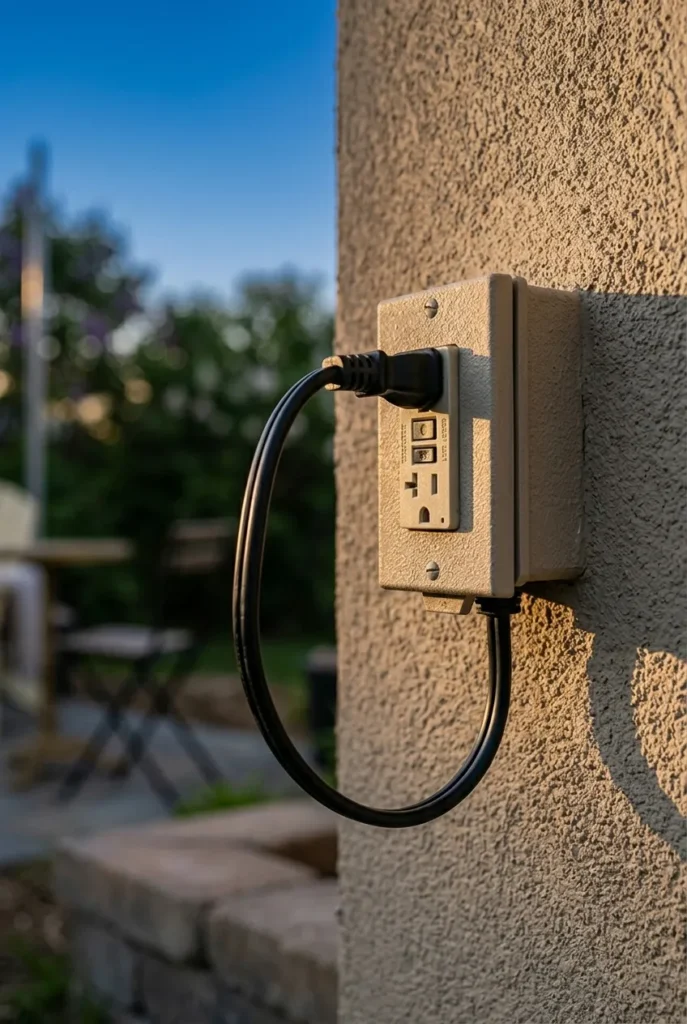
- Test the circuit. Plug into a GFCI outlet. Always GFCI for outdoor. Always.
The $87 Weekend Build (Real Numbers)
Four planter poles, one full 48 ft string, all the hardware. Real receipts from my own patio.
- 4 lengths of 3/4 inch EMT conduit: $48
- 4 black 5-gallon nursery planters (Lowe’s): $16
- 4 bags of 60 lb Quikrete: $28
- Brightech Ambience Pro 48 ft G40 string lights: $45 (Amazon)
- 4 marine-grade eye hooks plus 50 ft of 2 mm guide wire: $22
- River rock to top each planter: $12
Total: $171 for a four-pole setup with lights. Or strip it down to two poles plus an existing fence corner for $87. That is the build I recommend to anyone starting from zero.
If you want to add small Dollar Tree solar lanterns at the base of each pole for layered lighting, our guide on Dollar Tree backyard decor that looks expensive has the exact picks I use every summer.
The Five Mistakes That Wreck a DIY Pole Setup
I have made every one of these.
- Skipping the guide wire on long runs. String lights are heavy. A 48 ft strand without a guide wire will sag a foot in the middle by July. The fix is a $14 piece of aircraft cable.
- Cheap eye hooks. Standard zinc eye hooks rust through in one season. Spend the extra dollar on marine-grade stainless. The Consumer Product Safety Commission’s outdoor product guidance at cpsc.gov reinforces the same point: outdoor hardware needs corrosion ratings, not just any old hook from the bin.
- No drip loop at the plug end. Water runs down the cord and into the outlet. Every connector point needs a small drip loop so water drips off before reaching the plug.
- Burying the pole base in mulch. Mulch holds moisture against the planter and rots the bottom of any wood pole in two seasons. Set planters on pavers or gravel.
- Forgetting GFCI. Any outdoor outlet must be GFCI protected. This is code, and it is the difference between a great party and an actual fire. Confirm your outlet with a tester before you plug in.
DIY Pole Ideas for Specific Spaces
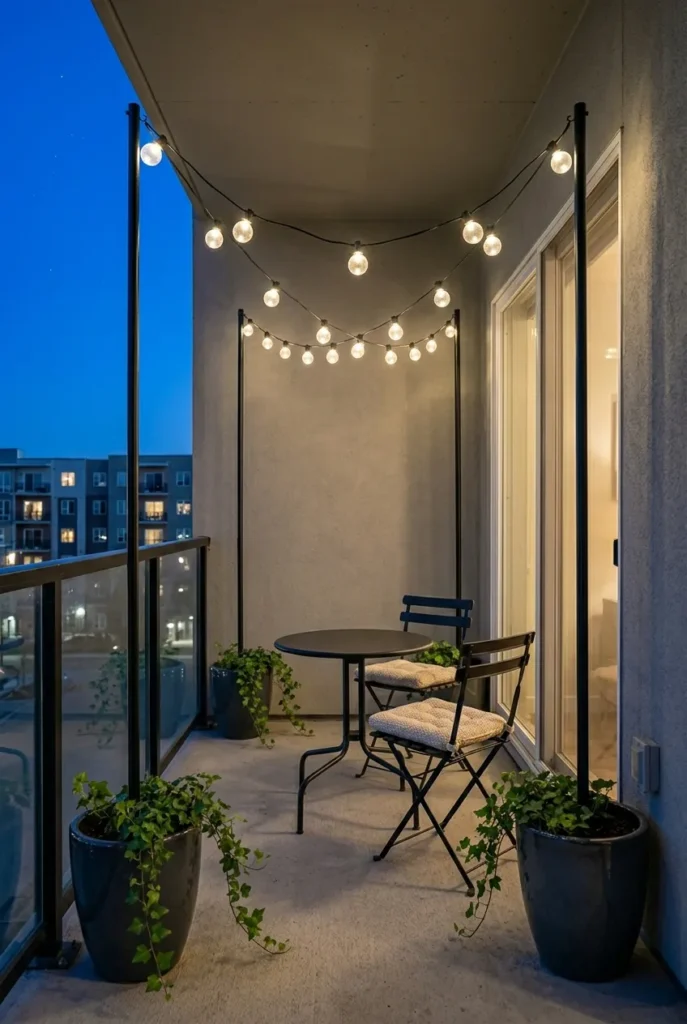
Small Balcony Poles
For a balcony, skip the freestanding pole entirely. Use two heavy planters with shorter 6 ft EMT conduit pieces, one in each corner. Anchor with 40 lb of concrete (less weight, less weight you have to haul up three flights of stairs). The shorter pole still gives you enough height to clear seated head height with room to spare.
Wedding or Single Event Poles
PVC is acceptable here. Buy ten 10 ft pipes, paint them flat white with outdoor spray paint, and anchor in 5-gallon buckets filled with sand instead of concrete. Sand is heavy enough for a calm-weather event and you can dump it back into the yard after. Total cost for ten poles: under $100.
Camping or Portable Poles
Use 4 ft sections of EMT conduit with a screw-in tent stake adapter at the bottom. Drive the stake into the ground, screw on the conduit, hang lights. Pack the whole rig flat in the car.
Deck Poles Without Drilling
Heavy-duty railing mount brackets from any hardware store accept a length of EMT conduit and clamp to existing 4×4 deck railing posts. Zero drilling into the deck itself. The same approach works for narrow side yards, and you can see how it fits into a longer outdoor layout in our 25 backyard patio ideas on a budget breakdown.
Choosing the Right String Lights for Your Pole
The pole is half the project. The lights matter too.
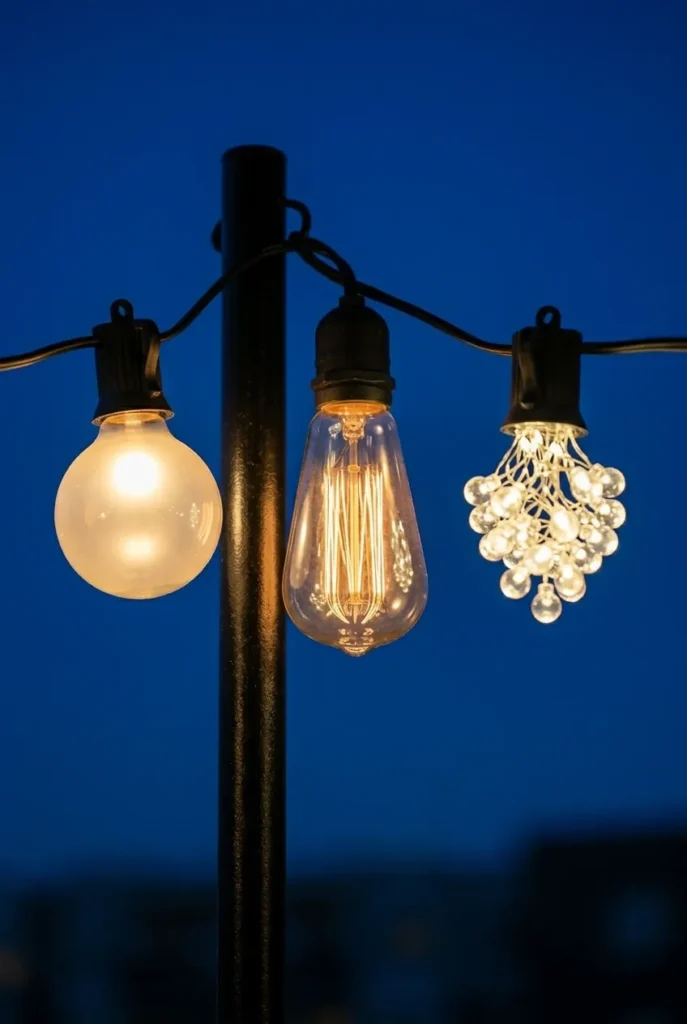
- G40 globe bulbs are the warm-glow standard. Brightech Ambience Pro at $45 for 48 ft is the best value Amazon best seller I have personally used.
- S14 Edison bulbs are slightly larger and have more visible filament. Better for a cottage aesthetic, worse if you want light to read by.
- Solar string lights are tempting but underwhelming. They dim by hour three and die by midnight. Skip for a real patio. Use them as accent only.
- Smart color-changing strings like Govee outdoor at $55 to $80 work great for parties but feel like overkill for daily ambience.
For lumens, Underwriters Laboratories outdoor lighting standards at ul.com note that any outdoor-rated bulb in a wet location should carry a wet-rated marking. Quick scan of the box before you buy saves a melted socket later.
FAQs
How do you make string light poles?
The simplest DIY string light pole is a 10 ft length of galvanized EMT conduit dropped into a 5-gallon planter filled with 60 lb of fast-setting Quikrete concrete. Center the pole, hold it plumb with a bubble level while the concrete sets, top with river rock to hide the concrete, and add a marine-grade eye hook at the top to clip your lights. Total build time is about 30 minutes per pole, plus 24 hours of cure time.
What can you use to hang string lights outside without trees?
Freestanding planter poles, fence-post extenders with hose clamps, railing-mount brackets, eye hooks screwed into existing pergolas or eaves, and adhesive hooks rated for outdoor use are the five no-tree options. For permanent installs, planter poles or buried 4×4 cedar posts work best. For renters, adhesive hooks or railing-mount brackets keep you deposit-safe.
What is the best material for a light pole?
Galvanized EMT conduit wins on cost and lifespan combined. It runs $12 to $15 per 10 ft length, holds up 8+ years outdoors, and the slim profile looks intentional in any planter. Pressure-treated 4×4 cedar is the runner-up if you want a more architectural look. Skip PVC for permanent setups since it yellows and gets brittle within two summers of direct sun.
How deep should a 4×4 post be buried for string lights?
In warm climates (USDA Zones 8 to 10), bury a 4×4 cedar post at least 24 inches deep with 50 lb of Quikrete around the base. In freeze zones (Zones 3 to 7), dig to the local frost line, typically 36 to 48 inches. The deeper hole prevents frost heave from tilting the pole in winter.
How far apart should string light poles be?
For a Brightech Ambience Pro 48 ft strand or similar, space poles 18 to 22 ft apart for the cleanest swag. Closer than 15 ft and the lights look bunched. Wider than 25 ft and you need a guide wire to prevent sagging in the middle.
Can you leave string lights outside all year?
Most outdoor-rated string lights handle full winter exposure as long as connectors stay dry. The poles themselves are fine outdoors year-round. The cost of taking down and rehanging every fall is more than the cost of any UV damage. I leave my Brightech strand up from May through October and store it for the four coldest months.
Do I need a permit for a DIY string light pole?
For freestanding planter poles, no. They are not permanent structures. For buried 4×4 posts taller than 6 ft in some municipalities, check local code. Anything wired into a 120V outlet must use a GFCI outlet and follow local electrical code.
The Takeaway
DIY string light poles are the single highest-impact backyard upgrade under $100. The planter pole build with EMT conduit and Quikrete is the version I keep coming back to: low cost, no drilling, looks intentional, lasts six summers. Skip the over-engineering. A 60 lb concrete base is enough. Use marine hardware. Add a guide wire on long runs. Plug into GFCI. That is the whole formula. If you want to round out the look with budget seating and ambience picks that pair with the poles, the cozy backyard ideas under $200 playbook is where I would send you next.


