
You step out the back door with your iced coffee and there it is again. Crispy lawn patches, a wobbly plastic chair fading in the sun, and that one corner where the mulch washed away the summer before last. You’ve saved fifty pins of dreamy yards and yours still looks like a rental listing from 2009. Sound familiar?
Here’s the good part. Every backyard makeover before and after you’re about to see started right where yours is sitting today. A patchy lawn, a sad slab of concrete, or a fence line nobody bothered to look at twice. We pulled twelve real backyard transformation case studies, broke down what actually changed, and tagged every project with a price tier so you can pick the one that fits your weekend, your wallet, and your skill level.
This roundup is organized by transformation type (lawn-free yards, patio glow-ups, fire pit corners, shed and pergola builds, and renter-friendly resets), then layered with budget tiers so the under-$500 reader and the splurge reader both leave with a plan.
Who This Backyard Transformation Guide Is For
You’ll get the most from this post if you fall into one of these buckets:
- Renters who want a backyard glow-up without losing the deposit (yes, we have a whole section for you).
- First-time homeowners staring at a builder-grade yard wondering where to start.
- Small-space dwellers working with anything under 400 square feet of usable outdoor space.
- Budget-conscious DIYers who want the under-$500 wins before the splurge projects.
- Weekend warriors with one or two free Saturdays and a Home Depot rental truck on standby.
If you have a full half-acre and a $40,000 landscaping budget, you’ll still find ideas here, but the splurge tier is where you’ll want to camp.
How We Picked These Yard Makeovers
Every transformation in this post had to clear three filters: a clear before photo most people could relate to (patchy lawn, ugly concrete, or just plain neglect), a finished after that didn’t require a professional landscape designer, and a cost range we could actually pin down. No mystery $80,000 reveals where the budget never gets mentioned.
Each idea answers three questions in order: what it is, why it works, and how to execute it this weekend.
1. The Patchy Lawn That Became a Pea Gravel Patio
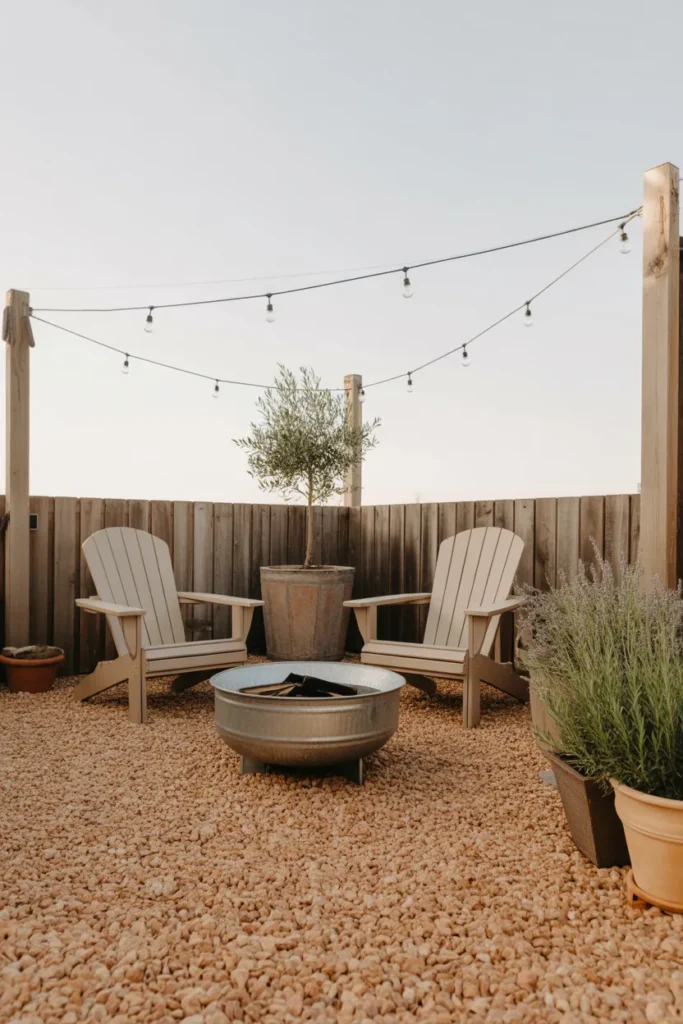
Before: A 12 by 14 foot rectangle of half-dead grass with bald spots where the dog had clearly won the war.
After: A warm honey-toned pea gravel patio with two Adirondack chairs, a galvanized fire pit, and a single olive tree in a terracotta pot.
Why it works: Pea gravel solves three problems at once. It kills the lawn battle, drains better than concrete, and gives you that crunchy underfoot sound that makes a yard feel like a French country bistro instead of a suburban tract home.
How to execute it (one weekend):
- Mark out your shape with landscape paint. Curved kidney shapes read more high-end than perfect rectangles.
- Lay a thick weed barrier (we like DeWitt Pro 5 from Home Depot, about $45 for a 4 by 100 foot roll).
- Edge with steel landscape edging or large stones to keep the gravel contained.
- Dump and rake pea gravel to a 2 to 3 inch depth.
Cost breakdown:
- Pea gravel (1 cubic yard, covers ~80 sq ft at 3 inches): $40-$60 from a local stone yard
- Weed fabric: $45
- Steel edging: $90 for 20 linear feet
- Two Adirondack chairs from Walmart: $148 ($74 each)
- Solo Stove Bonfire 2.0: $349 (splurge) or a $59 Walmart steel fire pit (budget)
- Total: $362 budget tier / $682 mid-range
2. The Plain Concrete Slab That Became an Outdoor Living Room
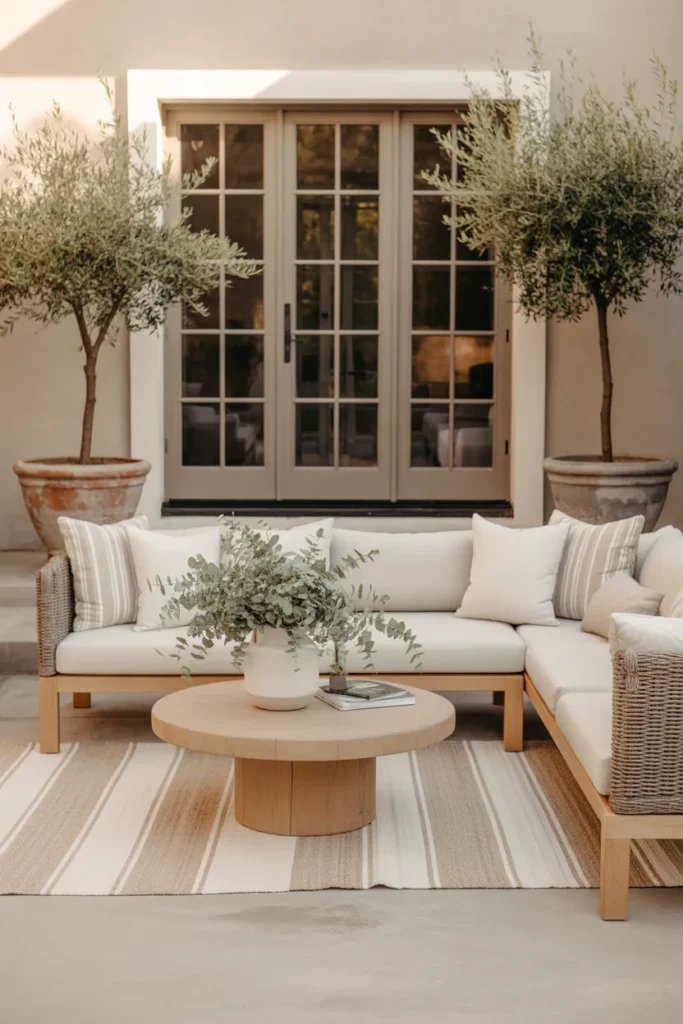
Before: A 10 by 12 foot stained concrete slab off the back door with one rusty bistro set nobody used.
After: A defined outdoor living room with a cream outdoor rug, a low-profile sectional, a coffee table built from a $40 IKEA Lack hack, and a pair of olive trees flanking the door.
Why it works: Concrete isn’t the problem, definition is. A rug, a real seating arrangement (sofa-facing-chairs, not chairs-staring-at-fence), and vertical greenery turn a slab into a room.
How to execute it:
- Power wash the slab. Free transformation, instant.
- Anchor a 5 by 8 outdoor rug (Ruggable Outdoor Collection runs $159-$249).
- Add a 3-piece outdoor sectional. The Walmart Better Homes & Gardens Belle Haven set runs around $698. The West Elm splurge equivalent is $2,400+.
- Flank the doorway with two 4-foot olive trees in matching terracotta pots ($120-$180 total at HomeGoods or Lowe’s).
Budget vs splurge:
- Budget ($800): Walmart sectional, IKEA rug, faux olive trees
- Splurge ($3,500): West Elm Portside sectional, Ruggable rug, real olive trees from a local nursery
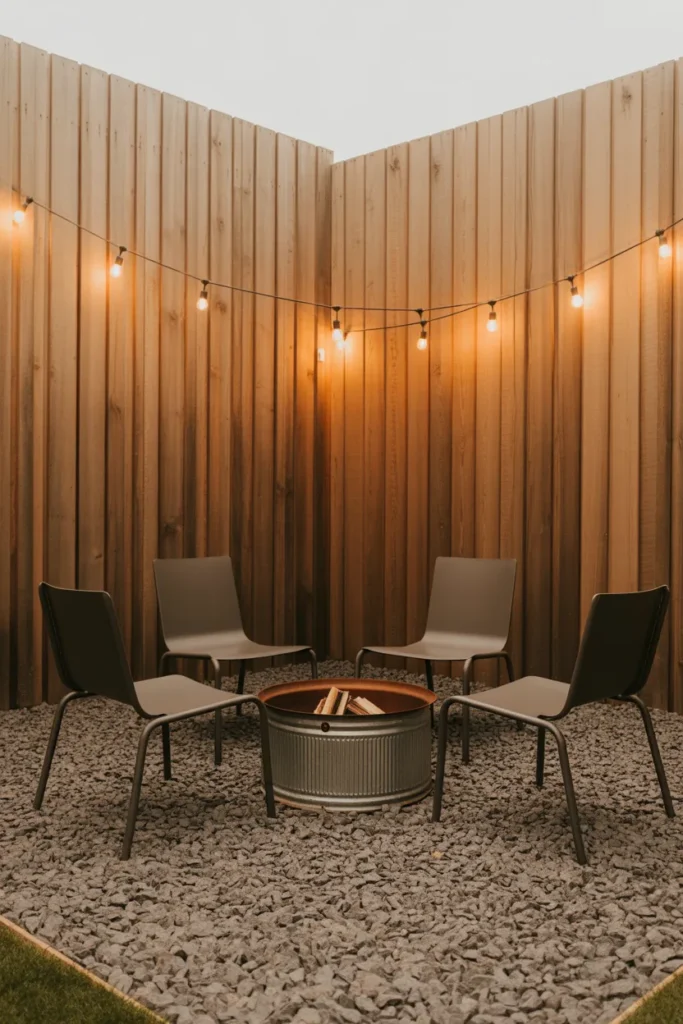
3. The Forgotten Corner That Became a Fire Pit Lounge
Most yards have one corner that’s just doing nothing. A triangle of grass nobody mows right, a spot where the gutter drips, or that awkward space where two fence lines meet.
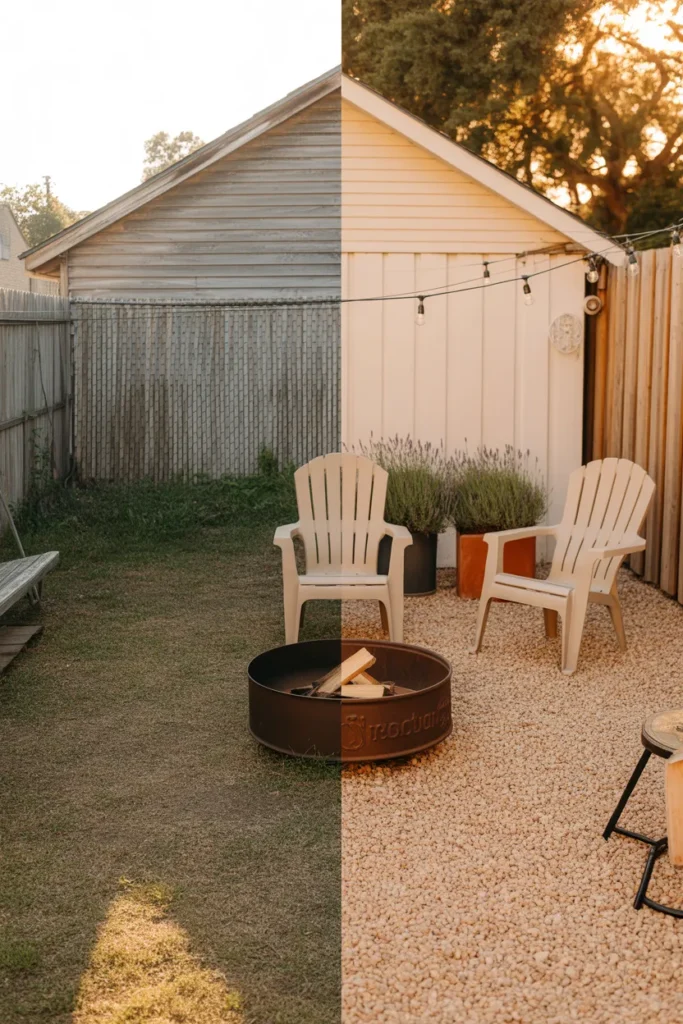
Before: A muddy corner where weeds grew waist-high every August.
After: A circular crushed-granite seating area with a $79 galvanized fire pit, four powder-coated steel chairs, and a single string of cafe lights pulling everything into a defined room.
Why it works: Circles read intentional. The brain reads “designed space” the moment you step into a curved seating zone.
Quick spec sheet:
- Circle diameter: 10 feet (works in yards as small as 250 sq ft)
- Materials: decomposed granite, steel edging, fire pit, four chairs, one string light strand
- Total cost: $310-$420 (budget tier)
For more corner-saving ideas like this one, here’s our full guide to 27 Backyard Ideas on a Budget That Make Any Yard Look Expensive.
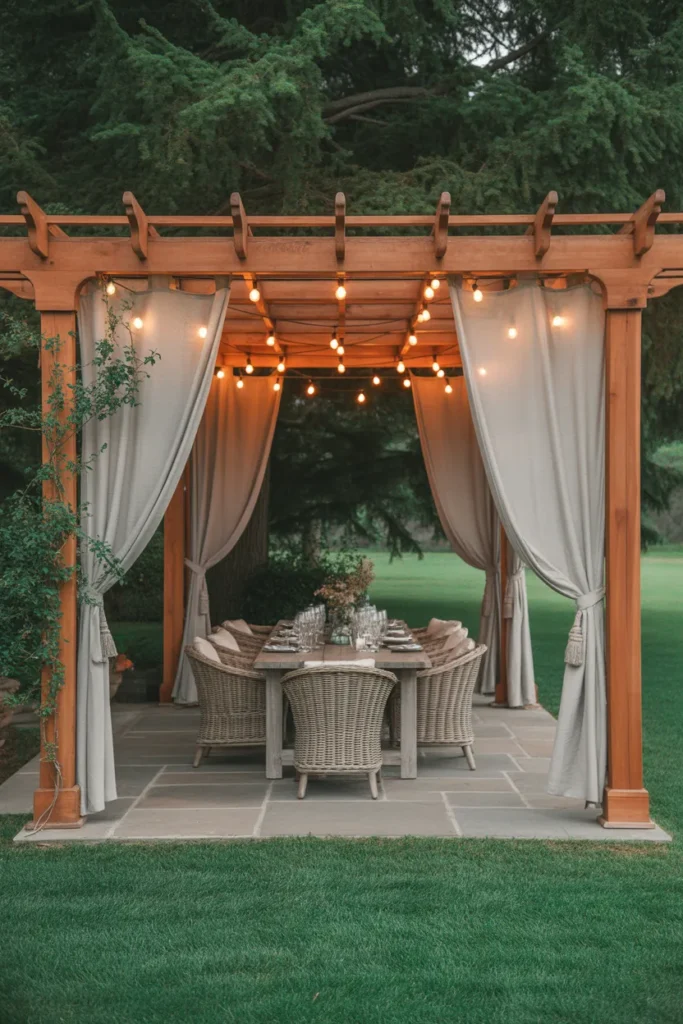
4. The Builder-Grade Yard That Got a Pergola and an Identity
Before: A flat green lawn straight from the developer brochure. Nothing wrong, nothing memorable.
After: A 10 by 12 cedar pergola over a flagstone patio, sheer linen curtains tied at the posts, climbing jasmine taking the south side, and a long farmhouse dining table underneath that seats eight.
Why it works: A pergola is the cheapest way to add architecture to a flat yard. It creates the “ceiling” your brain reads as a defined outdoor room.
How to execute it (one long weekend with two people):
- Buy a pergola kit. Toja Grid hardware ($800ish) plus your own lumber ($300) totals around $1,100 for a 10 by 12.
- Anchor to concrete footings or use Toja’s surface mounts on an existing patio.
- Stain the cedar in a warm walnut tone.
- Add hanging string lights and sheer outdoor curtains (Amazon, $40 for 4 panels).
Cost tiers:
- Budget DIY: $1,100 (Toja Grid + lumber)
- Mid-range kit: $2,400-$3,200 (Costco or Sam’s Club pre-fab pergola)
- Splurge professional install: $7,000-$12,000 (Restoration Hardware aesthetic, contractor labor)
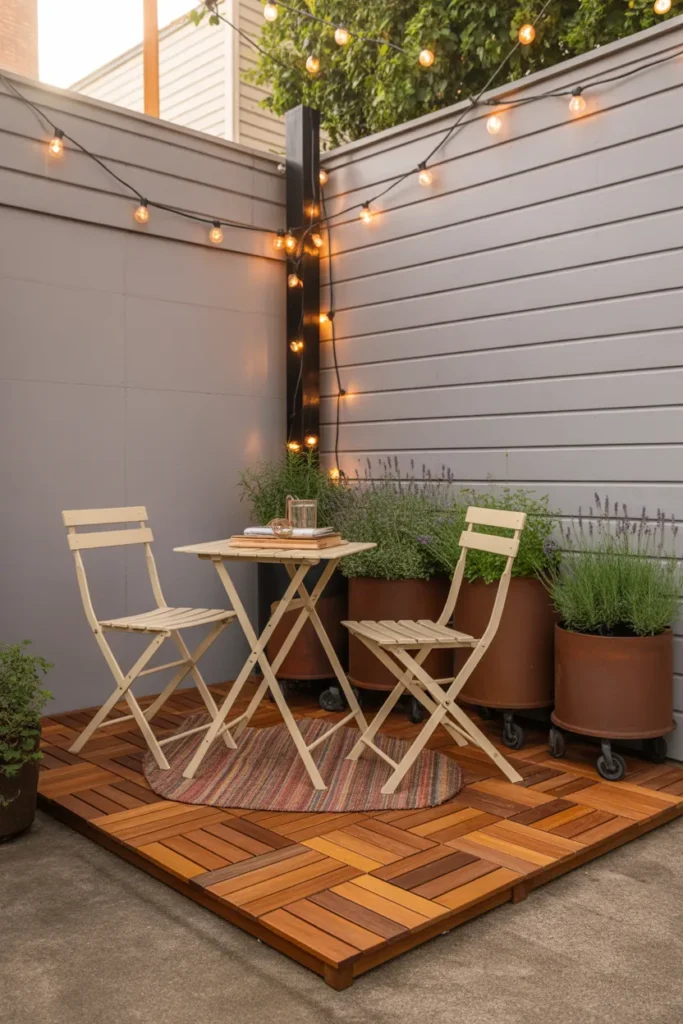
5. The Rental Backyard Reset (No Drill, No Deposit Drama)
Renters get the worst advice online: “just add a fire pit!” Cool, except your lease says no permanent fixtures and your landlord counts every blade of grass.
Here’s what actually works in a rental.
Before: A 200 sq ft concrete patio behind a duplex, one broken vinyl chair, a hose nobody coiled in four years.
After: A defined outdoor living room using zero permanent installations. Every piece leaves with the renter on moving day.
The full rental-friendly stack:
- Interlocking deck tiles over the ugly concrete (Amazon, $90 for 11 sq ft tiles covering 12 by 12 ft). Snap together, lift off when you leave.
- Freestanding cafe-light poles sunk into umbrella stands or large pots (no drilling into fence or house). $60-$90 each.
- Rolling planters on caster bases so you can rearrange and roll them out on moving day.
- Outdoor rug (5 by 8, Ruggable washable, $159).
- Two folding bistro chairs + collapsible side table that store in a closet during winter.
Total rental setup: $580-$720, fully portable, fully refundable on your deposit.
For the full breakdown of small-space rental tricks, including the 14 by 16 foot patio formula, here’s our guide to Small Backyard Ideas: Make a Tiny Yard Feel Twice as Big.
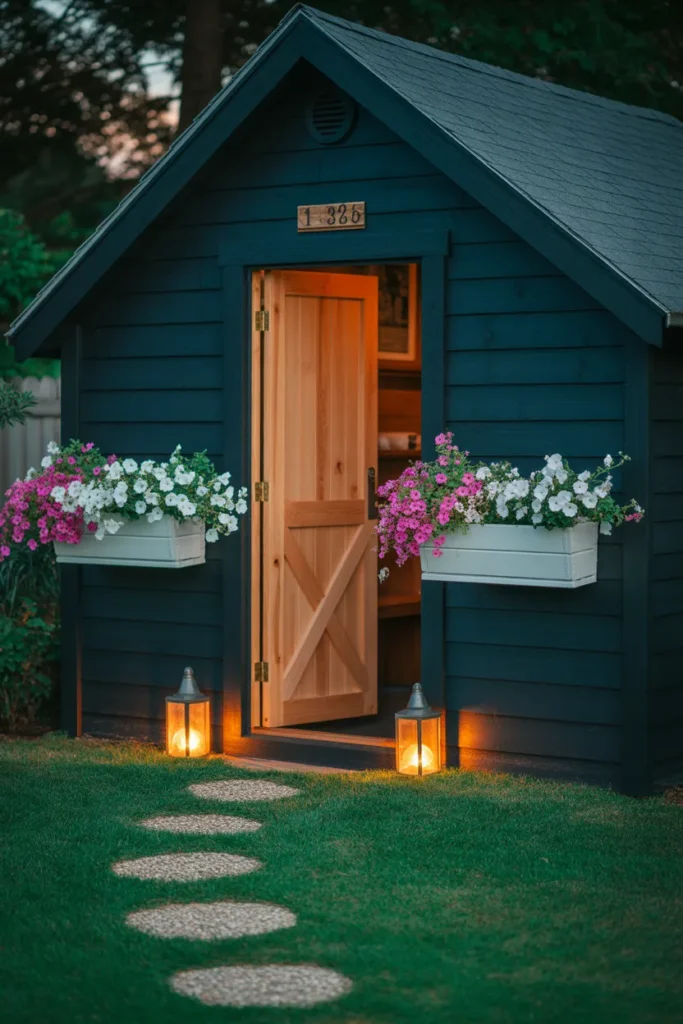
6. The Gutted Garden Shed That Became a Coffee Cabin
Before: A leaning 8 by 10 wood shed full of rusty tools and one very confused raccoon.
After: A painted-black cedar shed with a Dutch door, two window boxes spilling with petunias, and inside a tiny coffee station with a Smeg kettle, a single bistro chair, and a bookshelf.
Why it works: Sheds are the cheapest square footage in your yard. Repurposing one beats building a $15,000 backyard office every time.
The transformation:
- Pressure wash and repair siding ($0 if you already own a washer)
- Two coats of exterior paint in Sherwin-Williams Tricorn Black ($75)
- Replace door with a $220 Dutch door kit
- Add window boxes ($45 for two from Lowe’s)
- Interior: peel-and-stick wallpaper, IKEA shelf ($79), one cafe chair
Total shed makeover: $580-$900 depending on whether you need new siding boards.
7. The All-Pool, No-Personality Yard
Before: A 1980s kidney-shaped pool surrounded by stamped concrete and absolutely nothing else.
After: The same pool, now framed by a fresh cream pebble-tec resurface, two pergola-shaded lounge zones at opposite ends, drought-tolerant landscaping along the perimeter, and a single bougainvillea that does all the color work.
Why it works: Pool yards usually need less, not more. Stripping the chaos and adding two defined “ends” turns a pool deck into a vacation rental.
Splurge breakdown: Resurface ($4,500-$8,000), two pergola lounge zones ($2,200 each in DIY mode), perimeter planting ($600-$1,200). Total: $9,500-$13,500.
Budget pool refresh: Skip resurfacing, paint the deck with concrete stain ($180), add two umbrella lounges ($400 total), planters around the perimeter ($300). Total: $880.
8. The Lawn-Free Yard for the No-Mow Crowd
Before: A thirsty lawn that turned brown in July, lost the battle to crabgrass in August, and cost $80 a month in water.
After: A xeriscaped yard with drought-tolerant grasses, decomposed granite paths, three boulder clusters, and a winding cedar walkway.
Why it works: Lawns are the single most expensive thing in most yards (water, mowing, fertilizer, time). Removing yours can save $600-$1,200 a year. The EPA’s WaterSense program estimates the average American household uses 320 gallons of water a day, with about 30% going to outdoor use, mostly lawn irrigation. (Source: EPA WaterSense Outdoor Water Use.)
The plant palette that always works:
- Mexican feather grass (3 for $45)
- Lavender (5 for $60)
- Russian sage (3 for $45)
- Rosemary (3 for $30)
- One specimen olive or Japanese maple ($120-$280)
Total lawn-free conversion (500 sq ft): $1,200-$2,800 depending on whether you’re hauling gravel yourself.

9. The Sad Side Yard Strip Turned Garden Path
That narrow strip of grass between your house and the fence? The one that’s always muddy and you only visit when you take out the trash? It’s prime real estate, hiding.
Before: A 4 foot wide mud channel with a chewed-up hose and one rusty AC unit.
After: A flagstone stepping-stone path bordered by raised metal garden beds growing tomatoes and basil, a screen of climbing roses on the fence, and one decorative iron arch at the entry.
The numbers:
- Flagstone steppers (12 stones): $150
- Two metal raised beds (Vego or Birdies, 4 by 2 feet): $260
- Soil and amendments: $80
- Climbing rose plants (3): $90
- Iron garden arch: $130
Total side yard transformation: $710.
If raised beds caught your eye, our full guide to Metal Raised Garden Bed Ideas That Actually Look Good covers the exact brands, sizes, and soil-fill tricks that save hundreds.
10. The Privacy Fence Refresh
Before: A weather-grayed cedar fence, splintering at the top, with vines that died two summers ago still clinging to it.
After: Same fence, stained warm walnut, a horizontal cedar lattice topper added for 18 extra inches of privacy, two cafe-light strands strung along the length, and a built-in bench running 12 feet on the inside face.
Why it works: You rarely need a new fence. You need the one you have to look intentional.
The DIY breakdown:
- Pressure wash + sand: free, your own time
- Stain (Ready Seal Mahogany, 5 gallons): $145
- Lattice topper: $180 for 24 linear feet
- String lights: $35
- DIY bench (2×6 cedar boards): $210
Total fence and bench refresh: $570.
11. The Builder-Grade Concrete Patio Plus Outdoor Kitchen
Before: A standard 14 by 14 builder concrete patio with a single rusty Weber grill.
After: Same patio, now home to a modular grill island with cabinets, a bar-height counter with three stools, an outdoor mini fridge, and a pergola with a fan overhead.
Splurge tier territory. Modular grill islands from Sunjoy or NewAge run $1,800-$3,800. Add stainless undercounter fridge ($420), pergola ($1,800), three counter stools ($240), and you’re at $4,300-$6,300 all in.
Mid-range alternative: A rolling stainless cart from Costco ($340) plus a cedar bar-height table you build for $180 covers 70% of the look for $520.
12. The Builder-Grade Deck Glow-Up
Before: A 12 by 16 pressure-treated deck, gray and splintered, with one chiminea that hadn’t worked since the Obama administration.
After: Same deck, sanded and stained warm chestnut, a cream and rust striped outdoor rug, a low-profile sectional, and a built-in planter box at the railing growing rosemary and thyme.
Cost: $480-$720 (sander rental from Home Depot $45/day, stain $90, rug $159, planter wood and soil $90, plants $40, sectional $600 from Walmart if you don’t already own one).

The Backyard Makeover Budget Tier Matrix (Screenshot This)
| Transformation Type | Budget (Under $500) | Mid-Range ($500-$2,500) | Splurge ($2,500+) |
|---|---|---|---|
| Patio surface | Concrete stain, pea gravel | Pavers, flagstone steppers | Full stamped concrete or travertine |
| Seating | Walmart Adirondacks ($74 ea) | Target Threshold sectional | West Elm Portside |
| Fire feature | $59 Walmart steel pit | $349 Solo Stove Bonfire | $1,800 gas fire table |
| Shade | $40 sheer curtains + posts | Toja Grid pergola ($1,100) | Costco pergola kit + install |
| Lighting | $30 solar string lights | Hardwired cafe lights | Integrated LED + low-voltage path |
| Privacy | Bamboo roll fencing ($45) | Lattice topper ($180) | Full cedar privacy panels ($2,400+) |
| Plants | Big-box nursery starters | Local nursery 5-gallon | Specimen olive or Japanese maple |
| Rug | IKEA outdoor mat ($35) | Ruggable washable ($159) | West Elm hand-loomed ($400+) |
Common Mistakes That Ruin a Backyard Makeover
Even good ideas fall apart when one of these things happens. Skip these traps.
Mistake 1: Buying furniture before defining zones. You’ll end up with a sectional that doesn’t fit and a fire pit too close to the fence. Sketch your zones first, shop second.
Mistake 2: Skimping on the base. People spend $700 on furniture and $0 on the surface it sits on. A $59 pea gravel base under cheap chairs reads more luxurious than $700 chairs on patchy mud.
Mistake 3: Lawn-first thinking. If your climate fights you on grass (looking at you, Texas, Arizona, Southern California), stop watering a losing battle. The HGTV outdoor design team consistently flags lawn replacement as the highest-ROI move for dry-climate homeowners. (Source: HGTV Landscaping.)
Mistake 4: One giant project, no Phase 2 plan. A pergola without seating, lighting, and a defined surface underneath is just expensive wood in the sky. Phase your build: surface, shade, seating, lighting, plants.
Mistake 5: Forgetting drainage. A beautiful patio that holds water for three days after a storm becomes a mosquito factory. Slope all hard surfaces away from the house at 1/4 inch per foot, minimum.
Mistake 6: Matchy-matchy plant palettes. Three of one plant looks intentional. One of seven different plants looks like you panicked at Home Depot.
Mistake 7: Ignoring the view from inside. You’ll spend more time looking at your backyard through the kitchen window than from a chair in it. Frame the view from where you actually sit.
FAQ: Backyard Makeover Before and After
How do I do a backyard makeover in a small space or rental?
For small yards (under 400 sq ft), define one zone really well instead of five zones poorly. For rentals, work with portable interlocking deck tiles over ugly concrete, freestanding string-light poles, rolling planters, and an outdoor rug. Every piece should be liftable on moving day.
What’s the budget version of a backyard makeover?
A real $500 backyard makeover before and after typically includes pea gravel or concrete stain ($60-$180), two Adirondack chairs from Walmart ($148), a steel fire pit ($59), one strand of solar string lights ($30), and three potted plants from a big-box nursery ($60). Total: about $477 before tax. That’s the floor, and it looks great.
What if I don’t have a lawn at all (just concrete or dirt)?
You’re actually ahead. Concrete is the cheapest patio surface there is, and dirt is one weed barrier and one yard of pea gravel away from being a patio. Start with surface definition (rug, gravel, or stain), then add seating and shade.
How long does a backyard makeover take?
A weekend reset (paint, gravel, rug, lights, two chairs) is 8 to 14 hours of actual work. A full makeover with pergola, planting, and hardscape runs 3 to 6 weekends DIY, or 4 to 10 days with a hired crew. Plant establishment takes one full growing season to fill in, so plan for the long view.
How much does a typical backyard makeover cost?
Budget tier: $300-$800. Mid-range: $1,500-$5,000. Splurge with a contractor: $15,000-$50,000+. Most readers we hear from land between $1,200 and $3,500 for a complete first-pass transformation they’re genuinely proud of.
Can I get on a backyard makeover show?
Networks like HGTV, Magnolia Network, and Discovery+ cast through their network casting pages. Submissions usually require photos of the current yard, a written backstory, and budget flexibility. Wait times run 6 to 18 months and only a small percentage of applicants are picked.
What’s the highest-ROI backyard project for resale value?
Defined outdoor living space (patio + seating + shade) consistently returns the highest perceived value to buyers, ahead of pools, fancy landscaping, and outdoor kitchens. A clean pergola with a hardscape under it can add 5 to 8 percent to a home’s perceived value at listing.
Save This Post and Start Your Own Transformation
You’ve got twelve real backyard makeover before and after case studies, a budget tier matrix, a renter-friendly playbook, and the seven mistakes to avoid. The next step is the easiest one: pick the single transformation that fits your weekend and your wallet, and start there.
Pin this post so you can come back to the cost breakdowns once you’re standing at the Home Depot lumber aisle with a confused look. And if you’re still figuring out where the dollars stretch furthest, our companion guide on 27 Backyard Ideas on a Budget That Make Any Yard Look Expensive is the next click.
Which transformation matches your yard? Tell us in the comments which one you’re tackling first.


